> ## Documentation Index
> Fetch the complete documentation index at: https://docs.osto.one/llms.txt
> Use this file to discover all available pages before exploring further.
# Connecting AWS to Osto
> Securely connect your AWS account to Osto for continuous cloud security posture management.
This guide walks you through securely connecting your AWS account to Osto for continuous visibility, scanning, and cloud security posture management.
**Before you begin:**
* Open the [AWS Management Console](https://aws.amazon.com/console/) and sign in with your AWS credentials.
* You'll need to collect a few identifiers and credentials during this setup — follow the steps below carefully.
 Your **AWS Account ID** uniquely identifies your AWS account and is required for integration.
To find it:
1. In the AWS Console, search for **IAM**.
2. Open the **IAM (Identity and Access Management)** service.
3. On the **IAM Dashboard**, locate the **AWS Account** section.
4. Copy the **Account ID** and save it — you'll need it later.
Osto connects to AWS using an IAM user with restricted, read-only permissions. If you don't already have one, create it:
1. In the IAM sidebar, click **Users**.
2. Click **Create user**.
3. Enter a user name (for example, `osto-cloud-security-posture-management`).
4. Click **Next**.
Osto requires read-only access to scan and assess your cloud resources. Assign the following AWS-managed policies:
1. Under **Set permissions**, choose **Attach policies directly**.
2. Search for and select the following policies:
* **SecurityAudit**
* **ViewOnlyAccess**
3. Click **Next**, review details, and then click **Create user**.
Osto authenticates using access keys associated with your IAM user. To create one:
1. Return to **IAM → Users**.
2. Click on the user you created.
3. Go to the **Security credentials** tab.
4. Scroll down to **Access keys** and click **Create access key**.
5. Choose **Third-party service** (for integrations and monitoring).
6. Check the confirmation box and click **Next**.
* Add a tag description such as **"Osto integration key for monitoring resources"**.
* Click **Create access key**.
After the access key is created, the console will display:
* **Access Key ID**
* **Secret Access Key**
The Secret Access Key is only shown once. Copy and store it securely — if it's lost, you must create a new key.
Click **Done** after securely saving both values.
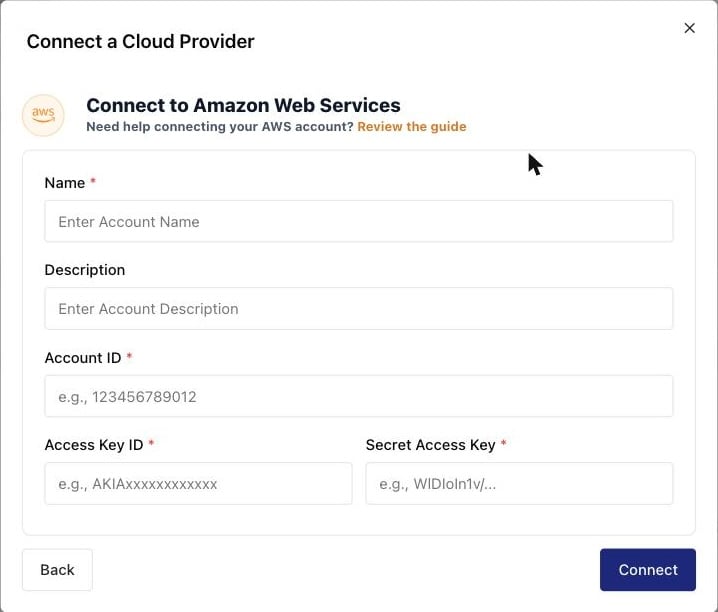
In the Osto platform, open the **Connect a Cloud Provider** window and select **Amazon Web Services (AWS)**.
Fill in the fields as follows:
* **Name:** A friendly name for your AWS connection (e.g., "Prod AWS Account").
* **Description:** Optional description for easier identification.
* **Account ID:** The AWS account ID you copied earlier.
* **Access Key ID:** The Access Key ID from the IAM user you created.
* **Secret Access Key:** The Secret Access Key generated in the previous step.
Once filled, click **Connect** to authenticate and establish the integration.
After connecting successfully:
* Your AWS assets will start syncing automatically.
* The **Osto Dashboard** will display asset count and necessary metrics.
* The connector's status will change to **Active**.
## Permissions Reference
At minimum, the IAM user must have:
* `SecurityAudit`
* `ViewOnlyAccess`
If your organization enforces least privilege, you may instead assign a custom IAM role restricted to Osto's required read-only actions.
## Summary of Required Values
| Parameter | Source | Example |
| ----------------- | ---------------------------------- | ------------------------------------------ |
| AWS Account ID | IAM Dashboard → AWS Account | `123456789012` |
| Access Key ID | IAM → Users → Security credentials | `AKIAIOSFODNN7EXAMPLE` |
| Secret Access Key | Shown once upon key creation | `wJalrXUtnFEMI/K7MDENG/bPxRfiCYEXAMPLEKEY` |
## Troubleshooting
If the connection fails, verify that the IAM user has both **SecurityAudit** and **ViewOnlyAccess** policies attached.
Double-check that your **Access Key ID** and **Secret Access Key** are correct.
If the **Secret Access Key** is lost, create a new access key — it cannot be retrieved later.
Ensure your network allows outbound connections to Osto's API endpoints.
Your **AWS Account ID** uniquely identifies your AWS account and is required for integration.
To find it:
1. In the AWS Console, search for **IAM**.
2. Open the **IAM (Identity and Access Management)** service.
3. On the **IAM Dashboard**, locate the **AWS Account** section.
4. Copy the **Account ID** and save it — you'll need it later.
Osto connects to AWS using an IAM user with restricted, read-only permissions. If you don't already have one, create it:
1. In the IAM sidebar, click **Users**.
2. Click **Create user**.
3. Enter a user name (for example, `osto-cloud-security-posture-management`).
4. Click **Next**.
Osto requires read-only access to scan and assess your cloud resources. Assign the following AWS-managed policies:
1. Under **Set permissions**, choose **Attach policies directly**.
2. Search for and select the following policies:
* **SecurityAudit**
* **ViewOnlyAccess**
3. Click **Next**, review details, and then click **Create user**.
Osto authenticates using access keys associated with your IAM user. To create one:
1. Return to **IAM → Users**.
2. Click on the user you created.
3. Go to the **Security credentials** tab.
4. Scroll down to **Access keys** and click **Create access key**.
5. Choose **Third-party service** (for integrations and monitoring).
6. Check the confirmation box and click **Next**.
* Add a tag description such as **"Osto integration key for monitoring resources"**.
* Click **Create access key**.
After the access key is created, the console will display:
* **Access Key ID**
* **Secret Access Key**
The Secret Access Key is only shown once. Copy and store it securely — if it's lost, you must create a new key.
Click **Done** after securely saving both values.
In the Osto platform, open the **Connect a Cloud Provider** window and select **Amazon Web Services (AWS)**.
Fill in the fields as follows:
* **Name:** A friendly name for your AWS connection (e.g., "Prod AWS Account").
* **Description:** Optional description for easier identification.
* **Account ID:** The AWS account ID you copied earlier.
* **Access Key ID:** The Access Key ID from the IAM user you created.
* **Secret Access Key:** The Secret Access Key generated in the previous step.
Once filled, click **Connect** to authenticate and establish the integration.
After connecting successfully:
* Your AWS assets will start syncing automatically.
* The **Osto Dashboard** will display asset count and necessary metrics.
* The connector's status will change to **Active**.
## Permissions Reference
At minimum, the IAM user must have:
* `SecurityAudit`
* `ViewOnlyAccess`
If your organization enforces least privilege, you may instead assign a custom IAM role restricted to Osto's required read-only actions.
## Summary of Required Values
| Parameter | Source | Example |
| ----------------- | ---------------------------------- | ------------------------------------------ |
| AWS Account ID | IAM Dashboard → AWS Account | `123456789012` |
| Access Key ID | IAM → Users → Security credentials | `AKIAIOSFODNN7EXAMPLE` |
| Secret Access Key | Shown once upon key creation | `wJalrXUtnFEMI/K7MDENG/bPxRfiCYEXAMPLEKEY` |
## Troubleshooting
If the connection fails, verify that the IAM user has both **SecurityAudit** and **ViewOnlyAccess** policies attached.
Double-check that your **Access Key ID** and **Secret Access Key** are correct.
If the **Secret Access Key** is lost, create a new access key — it cannot be retrieved later.
Ensure your network allows outbound connections to Osto's API endpoints.