

- Navigate to the Azure Portal.
- Sign in using your Azure account credentials.
- You’ll need to collect a few identifiers and credentials during this setup — follow the steps below carefully.
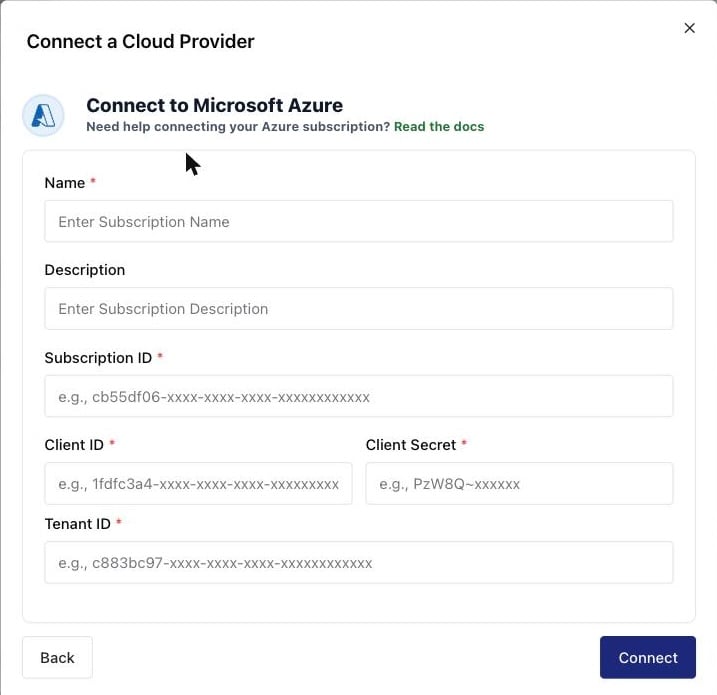
The Microsoft Azure connection form in Osto.
1
Find Your Tenant ID
Your Tenant ID uniquely identifies your Azure Active Directory (Microsoft Entra ID) instance.To find it:
- In the Azure Portal, search for “Microsoft Entra ID” (or “Azure Active Directory” in older interfaces).
- Click Overview in the sidebar.
- Copy the Tenant ID displayed there — you’ll need it later for the Osto connection form.
2
Locate Your Subscription ID
Your Subscription ID represents the Azure billing account that Osto will access.To locate it:
- In the Azure Portal search bar, type “Subscriptions”.
- Select your active subscription from the list.
- On the Overview tab, copy the Subscription ID.
3
Create or Use an Existing Service Principal
Osto connects to Azure via a Service Principal (App Registration). If you don’t already have one, create it as follows:
- In Azure Portal, go to Microsoft Entra ID → App registrations.
- Click + New registration.
- Provide a name (e.g.,
Osto-Azure-Connector). - Under “Supported account types,” choose Accounts in this organizational directory only (Single tenant).
- Click Register.
- Copy the Application (client) ID — this is your Client ID.
4
Generate a Client Secret
- In your App Registration, navigate to Certificates & secrets.
- Under Client secrets, click + New client secret.
- Provide a description (e.g., “Osto integration key”) and select an expiry period (e.g., 1 year).
- Click Add.
- Copy the Value immediately — this is your Client Secret.
5
Fill in the Osto Cloud Connector Form
Return to your Osto platform and open the Connect a Cloud Provider window. Select Microsoft Azure.Fill in the fields as follows:
- Name: A friendly name for your Azure connection (e.g., “Prod Subscription”).
- Description: Optional description for easier identification.
- Subscription ID: The Azure Subscription ID you copied earlier.
- Client ID: The Application (client) ID from your registered app.
- Client Secret: The secret value created under Certificates & Secrets.
- Tenant ID: The Tenant ID from Microsoft Entra ID.
6
Verify Connection
After connecting successfully:
- Your Azure assets will start syncing automatically.
- You’ll see the total number of assets and a severity breakdown on your Osto dashboard.
- The connector’s status will change to Active.
7
Optional: Assign Specific Azure Roles
Ensure your Service Principal has adequate permissions to allow asset discovery.
- At a minimum, assign the Reader role at the subscription level.
- If your organization enforces least privilege policies, you may also use a custom role scoped to Osto’s required actions.
Summary of Required Values
Troubleshooting
Error: "Invalid credentials"
Error: "Invalid credentials"
Double-check Client ID, Client Secret, and Tenant ID values entered in the Osto connector form.
Error: "Insufficient permissions"
Error: "Insufficient permissions"
Ensure your Service Principal has the Reader role assigned at the subscription level or the appropriate custom role that grants Osto the required permissions.
Secret Expired
Secret Expired
Generate a new client secret in Azure (App Registration → Certificates & secrets) and update it in Osto.