Reach every employee’s desktop through the Osto app — send campaigns, answer support requests, and control exactly what employees see.
ITSM (IT Service Management) is where you talk to your employees through the Osto app on their computers. From one place in the panel you can reach every desktop, hear back from every employee, and shape the app they use every day.
Path: ITSM → Campaigns · Support requests · Settings
Send campaigns
Notices, polls, quizzes and links that pop up right on employee desktops.
Handle support requests
Employees ask IT for help from the Osto app. You reply from the panel.
Control what employees see
Your branding, the websites links may point to, and which app features show.
ITSM is part of your plan. If your plan doesn’t include ITSM, the ITSM menu won’t show in the panel.
Finding your way around
In the panel’s left sidebar, open ITSM. It has three pages:
Page
What you do there
Campaigns
Create, track and manage everything you send to desktops.
Support requests
Read and answer help requests from employees.
Settings
Branding, allowed link domains and Osto app settings.
With read-only access you can see everything, but you can’t change or save anything.
New to ITSM? Set up Branding and Allowed link domains first. Without allowed domains, no link campaign can be published.
Campaigns
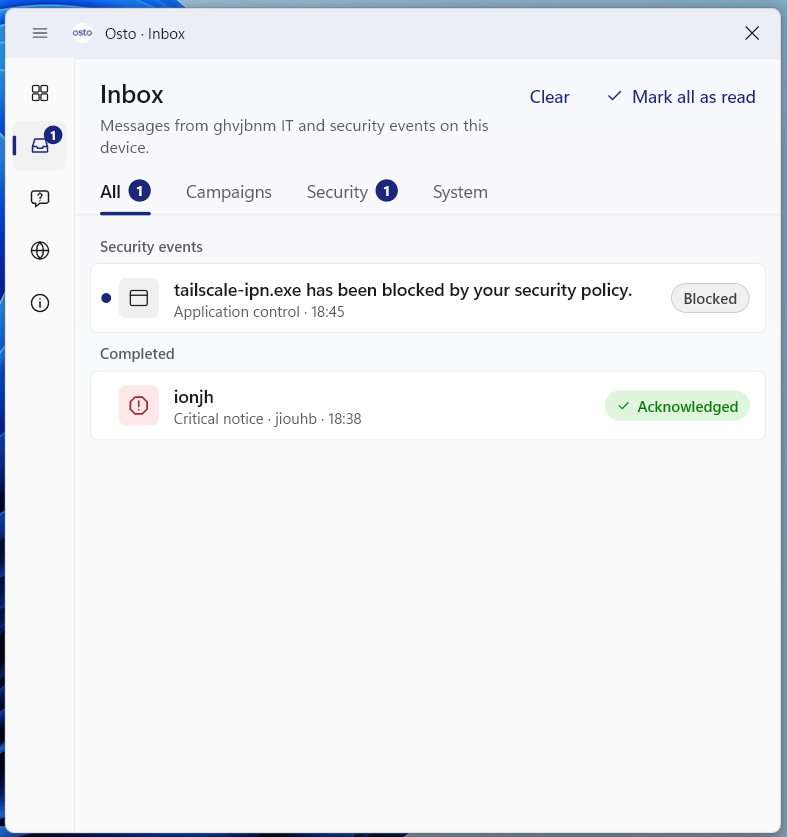
A campaign is anything you send to employee desktops. It appears as a pop-up on screen and is kept in the employee’s Inbox in the Osto app.
The Inbox in the Osto app keeps every campaign and security event for the employee.
Types of campaign
Notice
A message employees read and acknowledge.Kinds: Information, Warning, Critical
Poll
A survey with one or more questions.Kinds: CSAT, Tracking, Opinion, eNPS, General
Link
A button that opens a web page or a file download.Kinds: Installer, PDF
Quiz
Questions with right answers, a pass mark and a score.Kinds: Security awareness, General
The Campaigns page
The page lists every campaign with its type, status and how many people responded.
Use the filter chips to show All, Notices, Polls, Links or Quizzes.
Use the search box to find a campaign by its title.
Tiles at the top give a quick summary, such as how many devices are online.
What each status means
Status
Meaning
Draft
Saved but not sent yet.
Publishing
Being sent right now.
Scheduled
Published, waiting for its start time.
Live
Showing on desktops now.
Completed
Its end time has passed.
Stopped
Someone stopped it by hand.
Creating a campaign
Click Add campaign and work through these sections.
1
Type
Choose Notice, Poll, Link or Quiz, then choose its kind.
2
Content
From (team): who it comes from, for example “IT Helpdesk”.
Title: plain text only.
Message: you can use simple formatting such as bold, italic, lists and quotes.
Button text: leave it empty to use the default.
3
Questions (polls and quizzes only)
Employees see one question per screen.
Poll questions
Quiz questions
Star rating
Yes / no
Single choice
Multiple choice
0 to 10 scale
Agree / disagree scale
Free text
Up to 20 questions per poll.
Single choice
Multiple choice
Yes / no
Mark the correct answers and set points for each question. Up to 50 questions per quiz.
Other options:
Make an answer required.
Add a hint under the question.
Add an optional comment box under a star rating.
Mark an answer that must be chosen alone, such as “None of these”.
Make a poll Anonymous, so answers are stored without who gave them.
4
Quiz settings (quizzes only)
Setting
Range
Time limit
30 to 3,600 seconds
Pass mark
1% to 100%
Retakes
Let employees retake the quiz if they fail, and set how many attempts are allowed
Show answers
Show the correct answers after submitting
Correct answers stay on the server. Employees can’t see them before they answer.
5
Link (link campaigns only)
Enter the web address. It must start with https://, and its domain must be on your allowed list.
For a file download you can also add the file name, its size and its SHA-256 checksum (optional).
The link opens in the employee’s own browser.
6
Audience — “Who should get this?”
Who: pick Everyone in the organization, or Specific groups and people (choose user groups or single users).
On which computers? Pick All operating systems, or only some of Windows, macOS and Linux.
Also send to people and computers added later: new employees or devices that join while the campaign runs get it too. The system checks for new ones about every 5 minutes.
Who needs to respond:
Each person once, on any of their computers (default)
When a person answers on one computer, it closes on their other computers.
Every computer separately
Each computer needs its own answer.
7
Behaviour
Stays on screen until done (no close button): the employee must complete it before it goes away. Critical notices and quizzes always stay.
Priority (0 to 100): if several campaigns are waiting, the higher number shows first.
Employees may snooze it (“Remind me later”): choose how many snoozes are allowed (1 to 10) and how long to wait before reminding again.
Snooze isn’t available when Stays on screen until done is on.
8
Schedule
Start showing: leave it empty to start as soon as you publish. It can’t be in the past.
Stop showing: leave it empty to run until every employee has done it or you stop it. It must be at least 1 minute after the start time.
Times are in your own time zone.
9
Preview, save or publish
A live preview shows how the campaign will look on the employee’s desktop.
Click Save draft to keep working on it later.
Click Publish to send it. You’ll be asked to confirm, and then you’ll see how many devices it went to.
Publishing is refused if a link points to a domain that isn’t on your allowed list.
After publishing
Open a campaign from the list to see its details.
Recipients
Quiz results
You can see every device and where the campaign is on it:
Status
Meaning
Pending
The device hasn’t picked it up yet.
Delivered
It’s on the device but hasn’t been shown yet.
Displayed
It’s on screen, with no answer yet.
Completed
The employee acknowledged it, answered it, opened the link or finished the quiz.
Dismissed
It was closed without an answer.
Expired
It closed because the campaign ended or was stopped.
See who passed, who didn’t pass, who is still trying and who hasn’t attempted it.You also see the pass rate, the first-try pass rate and the number of attempts.
What you can do with a campaign
Action
What happens
Edit draft
Only drafts can be edited.
Publish
Sends a draft.
Stop campaign
The campaign closes on every device the next time the device checks in. Answers already given are kept.
A stopped campaign can’t be started again.
Support requests
Employees ask IT for help straight from the Osto app, and you answer from the panel. The whole conversation stays in one place.
How employees raise a request
1
Open Support
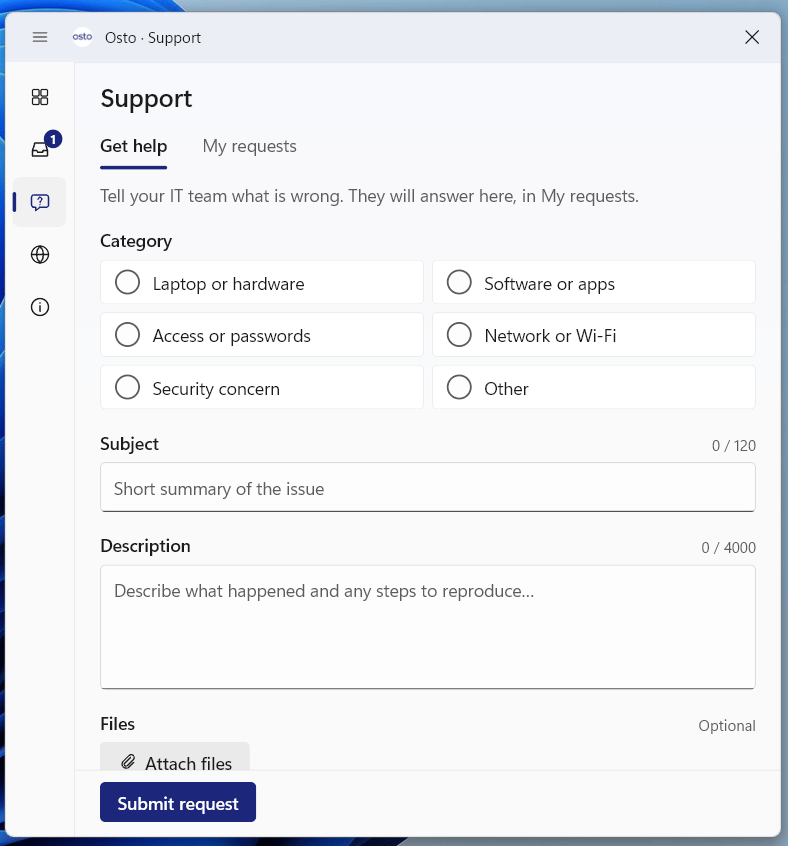
Open the Osto app and go to Get help / Support.
2
Pick a category
Laptop or hardware, Software, Access or passwords, Network or Wi-Fi, Security concern, or Other.
3
Describe the problem
A subject (one line, up to 120 characters) and a description (up to 4,000 characters).
4
Attach files if needed
Screenshots or videos — see the limits below.
5
Share device details
Choose whether to include computer name, system and Osto version. This helps IT.
6
Submit
Click Submit request. The employee gets a reference number, such as SUP-123.
Get help in the Osto app.
Attachment
Formats
Max size
Images
PNG, JPG, WebP
10 MB each
Videos
MP4, WebM
50 MB each
Up to 5 files per request.
A few more things about requests
If the computer is offline, the request is sent when it reconnects.
Each computer can send up to 10 requests a day. Any more are queued for later.
Employees can follow their requests under My requests and reply to IT.
If an employee replies to a resolved request, it opens again.
How admins handle requests
Go to ITSM → Support requests.
Browsing and searching
Use the status tabs: All, Unresolved, Open, In progress, Resolved, Closed.
Filter by category, by date (Today, Last 7, 30 or 90 days), or show Unread only.
Search by subject, text, reference number or person.
A tile at the top shows your Average first response time.
Working on a request
Open a request to see:
the conversation;
who sent it;
their device details, if they shared them (computer, system, Osto version, hardware ID, last seen);
any attachments.
Replying
Write a reply of up to 4,000 characters. You can attach up to 5 files.
If you attach files, you don’t need to write any text.
Press Ctrl + Enter to send.
The employee sees your reply in the Osto app.
Changing the status
From
You can move it to
Open
Start working on it (In progress), Mark resolved, Close
In progress
Mark resolved, Back to open, Close
Resolved
Reopen, Close
Closed
Reopen
Settings
Go to ITSM → Settings. There are three tabs.
Branding
This is how your company appears at the top of every campaign on employee desktops.
Company name: leave it empty to use your organization’s name in Osto.
Logo: PNG or JPEG, square, at most 64 KB. Without a logo, desktops show your company’s initials.
A preview shows how it will look.
Allowed link domains
This is the list of websites that campaign links may point to, for example example.com, or *.example.com for all its subdomains.
It applies to links in link campaigns and to links inside messages.
Publishing refuses any https link to a domain that isn’t on this list.
You can add up to 100 domains.
An empty list blocks all links.
Osto app — “Show in the Osto app”
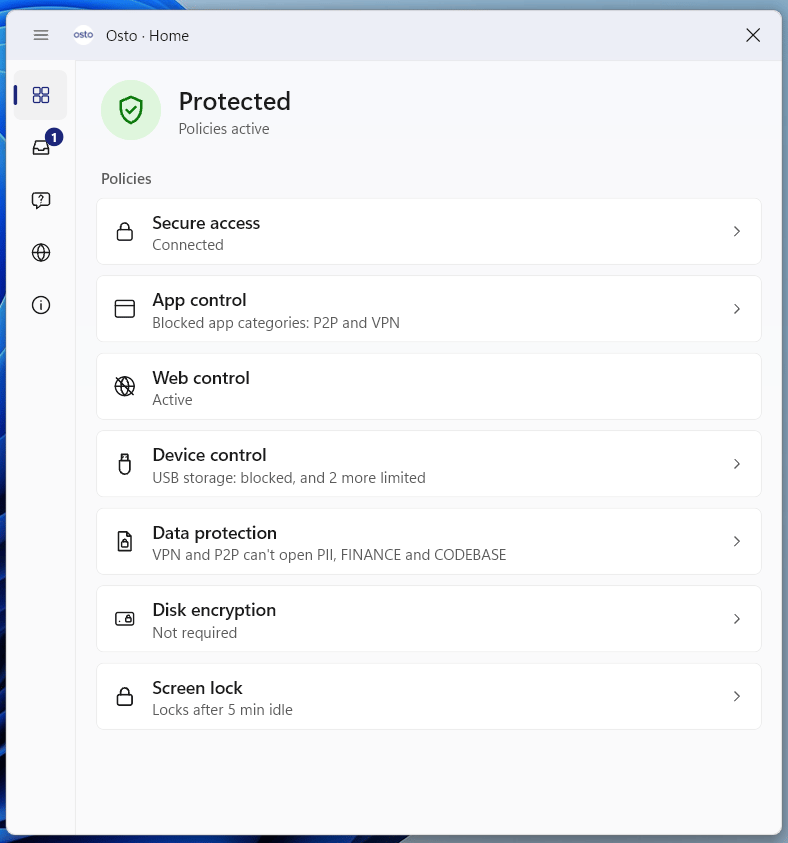
Choose what employees can see in the Osto app on their computers. Everything is on by default until you change it.
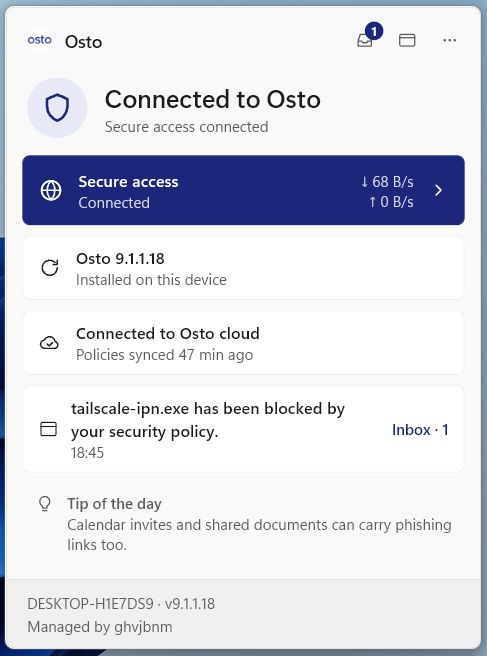
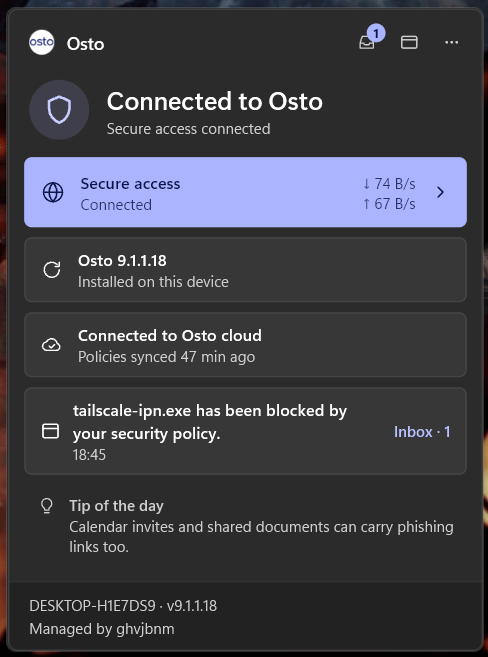
The Osto app home screen — each protection feature can be shown or hidden.
Campaigns
If you turn this off, campaigns stop reaching employees and nothing new can be published. You can still see past campaigns in the panel.
Support requests
If you turn this off, employees can’t send new requests or reply to existing ones from the app. You can still read and answer existing requests in the panel.
Tip of the day
Shows a daily security tip in the app.
Protection features
Choose which features employees can see in the app:
App control
Web control
Device control
Data protection
Disk encryption (not available on Linux)
Screen lock
Threat monitoring
Secure access
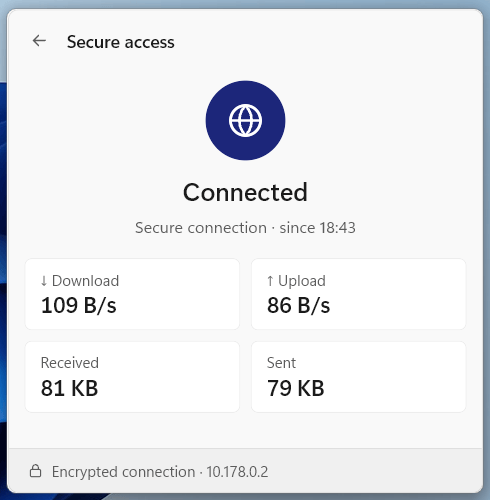
Secure access as employees see it.
Hiding a feature only hides it from employees. Your policies are still enforced.
Changes are only applied when you click Save. The page also shows who last changed these settings and when.
If your plan doesn’t include ITSM, you’ll still find these Osto app settings under Policies → Osto app.
Tips for getting the best out of ITSM
Set up the basics first
Configure Branding and Allowed link domains before anything else. Without allowed domains, no link campaign can be published.
Use Critical notices sparingly
They can’t be dismissed or snoozed.
Respect people's focus
Allow snooze on anything that isn’t urgent, so you don’t interrupt people’s work.
Reach new joiners automatically
Turn on Also send to people added later for long-running campaigns such as onboarding or policy notices.
Get honest feedback
Use anonymous polls when you want people to speak freely.
Make quizzes teach
Run security awareness quizzes with retakes and correct answers shown afterwards, so employees learn from their mistakes.
Ask for device details
Device details in support requests make problems much faster to solve.
Stay on top of the queue
Check the Unresolved tab daily and keep an eye on your average first response time.
{"docsConfig":{"theme":"mint","$schema":"https://mintlify.com/docs.json","name":"Osto Documentation","colors":{"primary":"#0066CC","light":"#3388FF","dark":"#0044AA"},"logo":{"light":"https://mintcdn.com/osto/2kI97xitQLxYCuFb/logo/light.png?fit=max\u0026auto=format\u0026n=2kI97xitQLxYCuFb\u0026q=85\u0026s=cfc939c048d40caec53b1ad32ace7c7c","dark":"https://mintcdn.com/osto/2kI97xitQLxYCuFb/logo/dark.png?fit=max\u0026auto=format\u0026n=2kI97xitQLxYCuFb\u0026q=85\u0026s=2c3cf5aa42c3a3a5f06d57fe87125fa1"},"favicon":"https://mintcdn.com/osto/YQDIYX96yvJSNGFf/favicon.svg?fit=max\u0026auto=format\u0026n=YQDIYX96yvJSNGFf\u0026q=85\u0026s=e8a4c2faa88a986b27b0054768bcb692","navbar":{"links":[{"href":"mailto:connect@osto.one","label":"Support"}]},"footer":{"socials":{"linkedin":"https://linkedin.com/company/osto"}},"styling":{"latex":false},"navigation":{"global":{"anchors":[{"anchor":"Website","icon":"globe","href":"https://osto.one"},{"anchor":"Support","icon":"envelope","href":"mailto:connect@osto.one"}]},"pages":[]}},"deployment":{"deploymentMetadataValue":{"subdomain":"osto","hasAudioNarration":false,"actualSubdomain":"osto","customDomains":["docs.osto.one"],"gitSource":{"type":"gitlab","owner":"osto","repo":"osto-docs","hostUrl":"https://gitlab.osto.cloud","projectId":535,"deployBranch":"mintlify-docs","contentDirectory":"","isPrivate":true,"mountPath":"","label":""},"entitlements":{"AI_CHAT":{"status":"DISABLED"}},"buildId":"6afe83e33eea259e6a7b4c8c","clientVersion":"0.0.4205","searchFilterCounts":[{"language":"default","tag":"Logs","count":7},{"language":"default","tag":"Asset Management","count":5},{"language":"default","tag":"Policy Configuration","count":5},{"language":"default","tag":"Support \u0026 Resources","count":5},{"language":"default","tag":"Posture Management","count":4},{"language":"default","tag":"Overview","count":4},{"language":"default","tag":"Scanner","count":3},{"language":"default","tag":"Getting Started","count":2},{"language":"default","tag":"Compliance","count":2},{"language":"default","tag":"Website Protection Policy","count":2}]},"assistantConfig":{"enableAskAiButton":false,"enableStarterQuestions":false,"enableContextualStarterQuestions":false,"enableAskAiSearchBar":true},"basePath":"","hasChatPermissions":false,"hasWebMcpPermissions":false,"toggles":[{"name":"kill-isr","enabled":true,"variant":{"name":"disabled","enabled":false,"feature_enabled":true},"impressionData":false},{"name":"custom-rbac-roles","enabled":true,"variant":{"name":"disabled","enabled":false,"feature_enabled":true},"impressionData":false},{"name":"agent-mintlify-slack","enabled":true,"variant":{"name":"disabled","enabled":false,"feature_enabled":true},"impressionData":false},{"name":"agent-integrations-settings","enabled":true,"variant":{"name":"disabled","enabled":false,"feature_enabled":true},"impressionData":false},{"name":"rbac-expansion","enabled":true,"variant":{"name":"disabled","enabled":false,"feature_enabled":true},"impressionData":false},{"name":"automations-pr-grouping","enabled":true,"variant":{"name":"disabled","enabled":false,"feature_enabled":true},"impressionData":false},{"name":"custom-prefix","enabled":true,"variant":{"name":"disabled","enabled":false,"feature_enabled":true},"impressionData":false},{"name":"analytics-v7","enabled":true,"variant":{"name":"disabled","enabled":false,"feature_enabled":true},"impressionData":false},{"name":"user-flows-analytics","enabled":true,"variant":{"name":"disabled","enabled":false,"feature_enabled":true},"impressionData":false},{"name":"no-publish-flow","enabled":true,"variant":{"name":"disabled","enabled":false,"feature_enabled":true},"impressionData":false},{"name":"workos-onboarding","enabled":true,"variant":{"name":"disabled","enabled":false,"feature_enabled":true},"impressionData":false},{"name":"snapshot-serving-live","enabled":true,"variant":{"name":"disabled","enabled":false,"feature_enabled":true},"impressionData":false},{"name":"stripTemperatureMiddleware","enabled":true,"variant":{"name":"disabled","enabled":false,"feature_enabled":true},"impressionData":false},{"name":"support-platform-pylon-zendesk","enabled":true,"variant":{"name":"disabled","enabled":false,"feature_enabled":true},"impressionData":false},{"name":"snapshot-serving","enabled":true,"variant":{"name":"disabled","enabled":false,"feature_enabled":true},"impressionData":false},{"name":"instant-rollback","enabled":true,"variant":{"name":"disabled","enabled":false,"feature_enabled":true},"impressionData":false},{"name":"granular-notifications-server","enabled":true,"variant":{"name":"disabled","enabled":false,"feature_enabled":true},"impressionData":false},{"name":"granular-notifications","enabled":true,"variant":{"name":"disabled","enabled":false,"feature_enabled":true},"impressionData":false},{"name":"automations-fable","enabled":true,"variant":{"name":"disabled","enabled":false,"feature_enabled":true},"impressionData":false},{"name":"fixed-ai-action-pricing","enabled":true,"variant":{"name":"disabled","enabled":false,"feature_enabled":true},"impressionData":false},{"name":"automation-resolve-merge-conflict","enabled":true,"variant":{"name":"disabled","enabled":false,"feature_enabled":true},"impressionData":false},{"name":"scoped-publishing","enabled":true,"variant":{"name":"disabled","enabled":false,"feature_enabled":true},"impressionData":false},{"name":"mintql","enabled":true,"variant":{"name":"disabled","enabled":false,"feature_enabled":true},"impressionData":false},{"name":"page-level-analytics","enabled":true,"variant":{"name":"disabled","enabled":false,"feature_enabled":true},"impressionData":false},{"name":"editor-version-history-v2","enabled":true,"variant":{"name":"disabled","enabled":false,"feature_enabled":true},"impressionData":false},{"name":"billing-page-v2","enabled":true,"variant":{"name":"disabled","enabled":false,"feature_enabled":true},"impressionData":false},{"name":"full-page-search","enabled":true,"variant":{"name":"disabled","enabled":false,"feature_enabled":true},"impressionData":false},{"name":"workspace-projects","enabled":true,"variant":{"name":"disabled","enabled":false,"feature_enabled":true},"impressionData":false},{"name":"assistant-v5","enabled":true,"variant":{"name":"disabled","enabled":false,"feature_enabled":true},"impressionData":false},{"name":"fork-pr-previews","enabled":true,"variant":{"name":"disabled","enabled":false,"feature_enabled":true},"impressionData":false},{"name":"revalidation-jwt","enabled":true,"variant":{"name":"disabled","enabled":false,"feature_enabled":true},"impressionData":false},{"name":"workos-sso-scim","enabled":true,"variant":{"name":"disabled","enabled":false,"feature_enabled":true},"impressionData":false},{"name":"hobby-abuse-scan","enabled":true,"variant":{"name":"disabled","enabled":false,"feature_enabled":true},"impressionData":false},{"name":"dashboard-inbox","enabled":true,"variant":{"name":"disabled","enabled":false,"feature_enabled":true},"impressionData":false},{"name":"workos-signup","enabled":true,"variant":{"name":"disabled","enabled":false,"feature_enabled":true},"impressionData":false},{"name":"turbopuffer-dual-write","enabled":true,"variant":{"name":"disabled","enabled":false,"feature_enabled":true},"impressionData":false},{"name":"workos-enabled","enabled":true,"variant":{"name":"disabled","enabled":false,"feature_enabled":true},"impressionData":false},{"name":"approve-review-flow","enabled":true,"variant":{"name":"disabled","enabled":false,"feature_enabled":true},"impressionData":false},{"name":"editor-metadata","enabled":true,"variant":{"name":"disabled","enabled":false,"feature_enabled":true},"impressionData":false},{"name":"sso-setup-deadline-banner","enabled":true,"variant":{"name":"disabled","enabled":false,"feature_enabled":true},"impressionData":false},{"name":"turbopuffer-serve","enabled":true,"variant":{"name":"disabled","enabled":false,"feature_enabled":true},"impressionData":false},{"name":"live-agents","enabled":true,"variant":{"name":"disabled","enabled":false,"feature_enabled":true},"impressionData":false},{"name":"starter-pricing","enabled":true,"variant":{"name":"treatment","enabled":true,"payload":{"type":"string","value":"treatment"},"feature_enabled":true},"impressionData":false},{"name":"llms-txt-v2","enabled":true,"variant":{"name":"disabled","enabled":false,"feature_enabled":true},"impressionData":false},{"name":"wildcard-email-auth","enabled":true,"variant":{"name":"disabled","enabled":false,"feature_enabled":true},"impressionData":false}],"googleFontsInlined":false},"customCss":[],"page":{"pagePath":"how-to-guides/itsm","slug":"/how-to-guides/itsm","pageMetadata":{"title":"ITSM","sidebarTitle":"ITSM User Guide","description":"Reach every employee's desktop through the Osto app — send campaigns, answer support requests, and control exactly what employees see.","icon":"headset","href":"/how-to-guides/itsm/index"},"description":{"compiledSource":"\"use strict\";\nconst {jsx: _jsx} = arguments[0];\nconst {useMDXComponents: _provideComponents} = arguments[0];\nfunction _createMdxContent(props) {\n const _components = {\n p: \"p\",\n ..._provideComponents(),\n ...props.components\n };\n return _jsx(_components.p, {\n children: \"Reach every employee’s desktop through the Osto app — send campaigns, answer support requests, and control exactly what employees see.\"\n });\n}\nfunction MDXContent(props = {}) {\n const {wrapper: MDXLayout} = {\n ..._provideComponents(),\n ...props.components\n };\n return MDXLayout ? _jsx(MDXLayout, {\n ...props,\n children: _jsx(_createMdxContent, {\n ...props\n })\n }) : _createMdxContent(props);\n}\nreturn {\n default: MDXContent\n};\n","frontmatter":{},"scope":{}},"pageType":"default","mdx":{"mdxSource":{"compiledSource":"\"use strict\";const{Fragment:_Fragment,jsx:_jsx,jsxs:_jsxs}=arguments[0];const{useMDXComponents:_provideComponents}=arguments[0];function _createMdxContent(props){const _components={a:`a`,blockquote:`blockquote`,code:`code`,em:`em`,hr:`hr`,li:`li`,p:`p`,strong:`strong`,tbody:`tbody`,td:`td`,th:`th`,thead:`thead`,tr:`tr`,ul:`ul`,..._provideComponents(),...props.components},{Accordion,AccordionGroup,Card,CardGroup,Check,Columns,Frame,Heading,Info,Mermaid,Note,OptimizedImage,Step,Steps,Tab,Table,Tabs,Tip,Warning}=_components;if(!Accordion)_missingMdxReference(`Accordion`,true);if(!AccordionGroup)_missingMdxReference(`AccordionGroup`,true);if(!Card)_missingMdxReference(`Card`,true);if(!CardGroup)_missingMdxReference(`CardGroup`,true);if(!Check)_missingMdxReference(`Check`,true);if(!Columns)_missingMdxReference(`Columns`,true);if(!Frame)_missingMdxReference(`Frame`,true);if(!Heading)_missingMdxReference(`Heading`,true);if(!Info)_missingMdxReference(`Info`,true);if(!Mermaid)_missingMdxReference(`Mermaid`,true);if(!Note)_missingMdxReference(`Note`,true);if(!OptimizedImage)_missingMdxReference(`OptimizedImage`,true);if(!Step)_missingMdxReference(`Step`,true);if(!Steps)_missingMdxReference(`Steps`,true);if(!Tab)_missingMdxReference(`Tab`,true);if(!Table)_missingMdxReference(`Table`,true);if(!Tabs)_missingMdxReference(`Tabs`,true);if(!Tip)_missingMdxReference(`Tip`,true);if(!Warning)_missingMdxReference(`Warning`,true);return _jsxs(_Fragment,{children:[_jsxs(_components.p,{children:[_jsx(_components.strong,{children:`ITSM (IT Service Management)`}),` is where you talk to your employees through the Osto app on their computers. From one place in the panel you can reach every desktop, hear back from every employee, and shape the app they use every day.`]}),`\n`,_jsxs(_components.blockquote,{children:[`\n`,_jsxs(_components.p,{children:[_jsx(_components.strong,{children:`Path:`}),` ITSM → Campaigns · Support requests · Settings`]}),`\n`]}),`\n`,_jsxs(Frame,{children:[_jsx(OptimizedImage,{className:`mint-block dark:mint-hidden`,src:`https://mintcdn.com/osto/lbK1ZB_l0ZwTotqQ/images/itsm/app-tray-light.png?fit=max\u0026auto=format\u0026n=lbK1ZB_l0ZwTotqQ\u0026q=85\u0026s=4809b9e94a9ffcf4217d86d01ca2f9a2`,alt:`The Osto app on an employee's desktop showing Connected to Osto, Secure access, an Inbox message and the Tip of the day`,style:{maxWidth:`400px`,margin:`0 auto`},\"data-og-width\":`487`,width:`487`,\"data-og-height\":`656`,height:`656`,\"data-path\":`images/itsm/app-tray-light.png`,\"data-optimize\":`true`,\"data-opv\":`3`,srcset:`https://mintcdn.com/osto/lbK1ZB_l0ZwTotqQ/images/itsm/app-tray-light.png?w=280\u0026fit=max\u0026auto=format\u0026n=lbK1ZB_l0ZwTotqQ\u0026q=85\u0026s=d684872601cc79b4085c599687cf1b3a 280w, https://mintcdn.com/osto/lbK1ZB_l0ZwTotqQ/images/itsm/app-tray-light.png?w=560\u0026fit=max\u0026auto=format\u0026n=lbK1ZB_l0ZwTotqQ\u0026q=85\u0026s=4c41b170d8b794e85e0276db1a2dfe80 560w, https://mintcdn.com/osto/lbK1ZB_l0ZwTotqQ/images/itsm/app-tray-light.png?w=840\u0026fit=max\u0026auto=format\u0026n=lbK1ZB_l0ZwTotqQ\u0026q=85\u0026s=1a9fd2bc1b274462d5c0868b41936fa6 840w, https://mintcdn.com/osto/lbK1ZB_l0ZwTotqQ/images/itsm/app-tray-light.png?w=1100\u0026fit=max\u0026auto=format\u0026n=lbK1ZB_l0ZwTotqQ\u0026q=85\u0026s=8d765d272184fc5aa03c206788d5780c 1100w, https://mintcdn.com/osto/lbK1ZB_l0ZwTotqQ/images/itsm/app-tray-light.png?w=1650\u0026fit=max\u0026auto=format\u0026n=lbK1ZB_l0ZwTotqQ\u0026q=85\u0026s=a88971dde378ae407d8d7f431db25f0f 1650w, https://mintcdn.com/osto/lbK1ZB_l0ZwTotqQ/images/itsm/app-tray-light.png?w=2500\u0026fit=max\u0026auto=format\u0026n=lbK1ZB_l0ZwTotqQ\u0026q=85\u0026s=0fef13bb70e3664bcf8530786400d297 2500w`}),_jsx(OptimizedImage,{className:`mint-hidden dark:mint-block`,src:`https://mintcdn.com/osto/lbK1ZB_l0ZwTotqQ/images/itsm/app-tray-dark.png?fit=max\u0026auto=format\u0026n=lbK1ZB_l0ZwTotqQ\u0026q=85\u0026s=1d8b00fbe76e447374e3e87f33a55d7b`,alt:`The Osto app on an employee's desktop in dark mode`,style:{maxWidth:`400px`,margin:`0 auto`},\"data-og-width\":`488`,width:`488`,\"data-og-height\":`657`,height:`657`,\"data-path\":`images/itsm/app-tray-dark.png`,\"data-optimize\":`true`,\"data-opv\":`3`,srcset:`https://mintcdn.com/osto/lbK1ZB_l0ZwTotqQ/images/itsm/app-tray-dark.png?w=280\u0026fit=max\u0026auto=format\u0026n=lbK1ZB_l0ZwTotqQ\u0026q=85\u0026s=c0d5beb334b00129d1cd625f60f3287f 280w, https://mintcdn.com/osto/lbK1ZB_l0ZwTotqQ/images/itsm/app-tray-dark.png?w=560\u0026fit=max\u0026auto=format\u0026n=lbK1ZB_l0ZwTotqQ\u0026q=85\u0026s=9e51be30994b8415c7f45eb293abcd50 560w, https://mintcdn.com/osto/lbK1ZB_l0ZwTotqQ/images/itsm/app-tray-dark.png?w=840\u0026fit=max\u0026auto=format\u0026n=lbK1ZB_l0ZwTotqQ\u0026q=85\u0026s=f0e14059b30f36fc08af9aca0c13d05c 840w, https://mintcdn.com/osto/lbK1ZB_l0ZwTotqQ/images/itsm/app-tray-dark.png?w=1100\u0026fit=max\u0026auto=format\u0026n=lbK1ZB_l0ZwTotqQ\u0026q=85\u0026s=9395804e5649551afe41a711568556ee 1100w, https://mintcdn.com/osto/lbK1ZB_l0ZwTotqQ/images/itsm/app-tray-dark.png?w=1650\u0026fit=max\u0026auto=format\u0026n=lbK1ZB_l0ZwTotqQ\u0026q=85\u0026s=59b8642e24f32f40745cc8fc52705d68 1650w, https://mintcdn.com/osto/lbK1ZB_l0ZwTotqQ/images/itsm/app-tray-dark.png?w=2500\u0026fit=max\u0026auto=format\u0026n=lbK1ZB_l0ZwTotqQ\u0026q=85\u0026s=b8c19c4312106fe4740adc5b28e1ab67 2500w`})]}),`\n`,_jsxs(CardGroup,{cols:3,children:[_jsx(Card,{title:`Send campaigns`,icon:`bullhorn`,href:`#campaigns`,children:_jsx(_components.p,{children:`Notices, polls, quizzes and links that pop up right on employee desktops.`})}),_jsx(Card,{title:`Handle support requests`,icon:`life-ring`,href:`#support-requests`,children:_jsx(_components.p,{children:`Employees ask IT for help from the Osto app. You reply from the panel.`})}),_jsx(Card,{title:`Control what employees see`,icon:`sliders`,href:`#settings`,children:_jsx(_components.p,{children:`Your branding, the websites links may point to, and which app features show.`})})]}),`\n`,_jsx(Note,{children:_jsxs(_components.p,{children:[`ITSM is part of your plan. If your plan doesn’t include ITSM, the `,_jsx(_components.strong,{children:`ITSM`}),` menu won’t show in the panel.`]})}),`\n`,_jsx(Heading,{level:`2`,id:`finding-your-way-around`,children:`Finding your way around`}),`\n`,_jsxs(_components.p,{children:[`In the panel’s left sidebar, open `,_jsx(_components.strong,{children:`ITSM`}),`. It has three pages:`]}),`\n`,_jsxs(Table,{children:[_jsx(_components.thead,{children:_jsxs(_components.tr,{children:[_jsx(_components.th,{children:`Page`}),_jsx(_components.th,{children:`What you do there`})]})}),_jsxs(_components.tbody,{children:[_jsxs(_components.tr,{children:[_jsx(_components.td,{children:_jsx(_components.strong,{children:`Campaigns`})}),_jsx(_components.td,{children:`Create, track and manage everything you send to desktops.`})]}),_jsxs(_components.tr,{children:[_jsx(_components.td,{children:_jsx(_components.strong,{children:`Support requests`})}),_jsx(_components.td,{children:`Read and answer help requests from employees.`})]}),_jsxs(_components.tr,{children:[_jsx(_components.td,{children:_jsx(_components.strong,{children:`Settings`})}),_jsx(_components.td,{children:`Branding, allowed link domains and Osto app settings.`})]})]})]}),`\n`,_jsx(Info,{children:_jsxs(_components.p,{children:[`With `,_jsx(_components.strong,{children:`read-only access`}),` you can see everything, but you can’t change or save anything.`]})}),`\n`,_jsx(Tip,{children:_jsxs(_components.p,{children:[_jsx(_components.strong,{children:`New to ITSM?`}),` Set up `,_jsx(_components.a,{href:`#branding`,children:`Branding`}),` and `,_jsx(_components.a,{href:`#allowed-link-domains`,children:`Allowed link domains`}),` first. Without allowed domains, no link campaign can be published.`]})}),`\n`,_jsx(_components.hr,{}),`\n`,_jsx(Heading,{level:`2`,id:`campaigns`,children:`Campaigns`}),`\n`,_jsxs(_components.p,{children:[`A campaign is anything you send to employee desktops. It appears as a pop-up on screen and is kept in the employee’s `,_jsx(_components.strong,{children:`Inbox`}),` in the Osto app.`]}),`\n`,_jsx(Frame,{caption:`The Inbox in the Osto app keeps every campaign and security event for the employee.`,children:_jsx(OptimizedImage,{src:`https://mintcdn.com/osto/lbK1ZB_l0ZwTotqQ/images/itsm/app-inbox.png?fit=max\u0026auto=format\u0026n=lbK1ZB_l0ZwTotqQ\u0026q=85\u0026s=a4a7fa42986ccb2e204f54472dde260e`,alt:`Osto app Inbox with tabs for All, Campaigns, Security and System, listing a security event and an acknowledged critical notice`,style:{maxWidth:`620px`,margin:`0 auto`},\"data-og-width\":`787`,width:`787`,\"data-og-height\":`837`,height:`837`,\"data-path\":`images/itsm/app-inbox.png`,\"data-optimize\":`true`,\"data-opv\":`3`,srcset:`https://mintcdn.com/osto/lbK1ZB_l0ZwTotqQ/images/itsm/app-inbox.png?w=280\u0026fit=max\u0026auto=format\u0026n=lbK1ZB_l0ZwTotqQ\u0026q=85\u0026s=20febc932f08d10e41195212b41946ef 280w, https://mintcdn.com/osto/lbK1ZB_l0ZwTotqQ/images/itsm/app-inbox.png?w=560\u0026fit=max\u0026auto=format\u0026n=lbK1ZB_l0ZwTotqQ\u0026q=85\u0026s=bf34f19e8503981e8929bafe23100500 560w, https://mintcdn.com/osto/lbK1ZB_l0ZwTotqQ/images/itsm/app-inbox.png?w=840\u0026fit=max\u0026auto=format\u0026n=lbK1ZB_l0ZwTotqQ\u0026q=85\u0026s=32d4f04782f10a793f2d9dd66a8bebfe 840w, https://mintcdn.com/osto/lbK1ZB_l0ZwTotqQ/images/itsm/app-inbox.png?w=1100\u0026fit=max\u0026auto=format\u0026n=lbK1ZB_l0ZwTotqQ\u0026q=85\u0026s=64128457deb197d906e217690483ebec 1100w, https://mintcdn.com/osto/lbK1ZB_l0ZwTotqQ/images/itsm/app-inbox.png?w=1650\u0026fit=max\u0026auto=format\u0026n=lbK1ZB_l0ZwTotqQ\u0026q=85\u0026s=65236994ad6236d8ac0dbb33eda000e3 1650w, https://mintcdn.com/osto/lbK1ZB_l0ZwTotqQ/images/itsm/app-inbox.png?w=2500\u0026fit=max\u0026auto=format\u0026n=lbK1ZB_l0ZwTotqQ\u0026q=85\u0026s=9db77ce41133179384a8b5519bd803e4 2500w`})}),`\n`,_jsx(Heading,{level:`3`,id:`types-of-campaign`,children:`Types of campaign`}),`\n`,_jsxs(CardGroup,{cols:2,children:[_jsxs(Card,{title:`Notice`,icon:`circle-info`,children:[_jsx(_components.p,{children:`A message employees read and acknowledge.`}),_jsxs(_components.p,{children:[_jsx(_components.strong,{children:`Kinds:`}),` Information, Warning, Critical`]})]}),_jsxs(Card,{title:`Poll`,icon:`square-poll-vertical`,children:[_jsx(_components.p,{children:`A survey with one or more questions.`}),_jsxs(_components.p,{children:[_jsx(_components.strong,{children:`Kinds:`}),` CSAT, Tracking, Opinion, eNPS, General`]})]}),_jsxs(Card,{title:`Link`,icon:`link`,children:[_jsx(_components.p,{children:`A button that opens a web page or a file download.`}),_jsxs(_components.p,{children:[_jsx(_components.strong,{children:`Kinds:`}),` Installer, PDF`]})]}),_jsxs(Card,{title:`Quiz`,icon:`graduation-cap`,children:[_jsx(_components.p,{children:`Questions with right answers, a pass mark and a score.`}),_jsxs(_components.p,{children:[_jsx(_components.strong,{children:`Kinds:`}),` Security awareness, General`]})]})]}),`\n`,_jsx(Heading,{level:`3`,id:`the-campaigns-page`,children:`The Campaigns page`}),`\n`,_jsxs(_components.ul,{children:[`\n`,_jsxs(_components.li,{children:[`The page lists every campaign with its `,_jsx(_components.strong,{children:`type`}),`, `,_jsx(_components.strong,{children:`status`}),` and `,_jsx(_components.strong,{children:`how many people responded`}),`.`]}),`\n`,_jsxs(_components.li,{children:[`Use the `,_jsx(_components.strong,{children:`filter chips`}),` to show `,_jsx(_components.strong,{children:`All`}),`, `,_jsx(_components.strong,{children:`Notices`}),`, `,_jsx(_components.strong,{children:`Polls`}),`, `,_jsx(_components.strong,{children:`Links`}),` or `,_jsx(_components.strong,{children:`Quizzes`}),`.`]}),`\n`,_jsxs(_components.li,{children:[`Use the `,_jsx(_components.strong,{children:`search box`}),` to find a campaign by its title.`]}),`\n`,_jsxs(_components.li,{children:[_jsx(_components.strong,{children:`Tiles`}),` at the top give a quick summary, such as how many devices are online.`]}),`\n`]}),`\n`,_jsx(Heading,{level:`4`,id:`what-each-status-means`,children:`What each status means`}),`\n`,_jsx(Mermaid,{chart:`flowchart LR\n D[Draft] --> P[Publishing]\n P --> S[Scheduled]\n P --> L[Live]\n S --> L\n L --> C[Completed]\n L --> X[Stopped]\n S --> X`}),`\n`,_jsxs(Table,{children:[_jsx(_components.thead,{children:_jsxs(_components.tr,{children:[_jsx(_components.th,{children:`Status`}),_jsx(_components.th,{children:`Meaning`})]})}),_jsxs(_components.tbody,{children:[_jsxs(_components.tr,{children:[_jsx(_components.td,{children:_jsx(_components.strong,{children:`Draft`})}),_jsx(_components.td,{children:`Saved but not sent yet.`})]}),_jsxs(_components.tr,{children:[_jsx(_components.td,{children:_jsx(_components.strong,{children:`Publishing`})}),_jsx(_components.td,{children:`Being sent right now.`})]}),_jsxs(_components.tr,{children:[_jsx(_components.td,{children:_jsx(_components.strong,{children:`Scheduled`})}),_jsx(_components.td,{children:`Published, waiting for its start time.`})]}),_jsxs(_components.tr,{children:[_jsx(_components.td,{children:_jsx(_components.strong,{children:`Live`})}),_jsx(_components.td,{children:`Showing on desktops now.`})]}),_jsxs(_components.tr,{children:[_jsx(_components.td,{children:_jsx(_components.strong,{children:`Completed`})}),_jsx(_components.td,{children:`Its end time has passed.`})]}),_jsxs(_components.tr,{children:[_jsx(_components.td,{children:_jsx(_components.strong,{children:`Stopped`})}),_jsx(_components.td,{children:`Someone stopped it by hand.`})]})]})]}),`\n`,_jsx(Heading,{level:`3`,id:`creating-a-campaign`,children:`Creating a campaign`}),`\n`,_jsxs(_components.p,{children:[`Click `,_jsx(_components.strong,{children:`Add campaign`}),` and work through these sections.`]}),`\n`,_jsxs(Steps,{children:[_jsx(Step,{title:`Type`,children:_jsxs(_components.p,{children:[`Choose `,_jsx(_components.strong,{children:`Notice`}),`, `,_jsx(_components.strong,{children:`Poll`}),`, `,_jsx(_components.strong,{children:`Link`}),` or `,_jsx(_components.strong,{children:`Quiz`}),`, then choose its kind.`]})}),_jsx(Step,{title:`Content`,children:_jsxs(_components.ul,{children:[`\n`,_jsxs(_components.li,{children:[_jsx(_components.strong,{children:`From (team):`}),` who it comes from, for example `,_jsx(_components.em,{children:`“IT Helpdesk”`}),`.`]}),`\n`,_jsxs(_components.li,{children:[_jsx(_components.strong,{children:`Title:`}),` plain text only.`]}),`\n`,_jsxs(_components.li,{children:[_jsx(_components.strong,{children:`Message:`}),` you can use simple formatting such as `,_jsx(_components.strong,{children:`bold`}),`, `,_jsx(_components.em,{children:`italic`}),`, lists and quotes.`]}),`\n`,_jsxs(_components.li,{children:[_jsx(_components.strong,{children:`Button text:`}),` leave it empty to use the default.`]}),`\n`]})}),_jsxs(Step,{title:`Questions (polls and quizzes only)`,children:[_jsxs(_components.p,{children:[`Employees see `,_jsx(_components.strong,{children:`one question per screen`}),`.`]}),_jsxs(Tabs,{children:[_jsxs(Tab,{title:`Poll questions`,id:`poll-questions`,children:[_jsxs(_components.ul,{children:[`\n`,_jsx(_components.li,{children:`Star rating`}),`\n`,_jsx(_components.li,{children:`Yes / no`}),`\n`,_jsx(_components.li,{children:`Single choice`}),`\n`,_jsx(_components.li,{children:`Multiple choice`}),`\n`,_jsx(_components.li,{children:`0 to 10 scale`}),`\n`,_jsx(_components.li,{children:`Agree / disagree scale`}),`\n`,_jsx(_components.li,{children:`Free text`}),`\n`]}),_jsxs(_components.p,{children:[`Up to `,_jsx(_components.strong,{children:`20 questions`}),` per poll.`]})]}),_jsxs(Tab,{title:`Quiz questions`,id:`quiz-questions`,children:[_jsxs(_components.ul,{children:[`\n`,_jsx(_components.li,{children:`Single choice`}),`\n`,_jsx(_components.li,{children:`Multiple choice`}),`\n`,_jsx(_components.li,{children:`Yes / no`}),`\n`]}),_jsxs(_components.p,{children:[`Mark the correct answers and set `,_jsx(_components.strong,{children:`points`}),` for each question. Up to `,_jsx(_components.strong,{children:`50 questions`}),` per quiz.`]})]})]}),_jsx(_components.p,{children:_jsx(_components.strong,{children:`Other options:`})}),_jsxs(_components.ul,{children:[`\n`,_jsxs(_components.li,{children:[`Make an answer `,_jsx(_components.strong,{children:`required`}),`.`]}),`\n`,_jsxs(_components.li,{children:[`Add a `,_jsx(_components.strong,{children:`hint`}),` under the question.`]}),`\n`,_jsxs(_components.li,{children:[`Add an optional `,_jsx(_components.strong,{children:`comment box`}),` under a star rating.`]}),`\n`,_jsxs(_components.li,{children:[`Mark an answer that must be `,_jsx(_components.strong,{children:`chosen alone`}),`, such as `,_jsx(_components.em,{children:`“None of these”`}),`.`]}),`\n`,_jsxs(_components.li,{children:[`Make a poll `,_jsx(_components.strong,{children:`Anonymous`}),`, so answers are stored without who gave them.`]}),`\n`]})]}),_jsxs(Step,{title:`Quiz settings (quizzes only)`,children:[_jsxs(Table,{children:[_jsx(_components.thead,{children:_jsxs(_components.tr,{children:[_jsx(_components.th,{children:`Setting`}),_jsx(_components.th,{children:`Range`})]})}),_jsxs(_components.tbody,{children:[_jsxs(_components.tr,{children:[_jsx(_components.td,{children:_jsx(_components.strong,{children:`Time limit`})}),_jsx(_components.td,{children:`30 to 3,600 seconds`})]}),_jsxs(_components.tr,{children:[_jsx(_components.td,{children:_jsx(_components.strong,{children:`Pass mark`})}),_jsx(_components.td,{\"data-numeric\":`true`,children:`1% to 100%`})]}),_jsxs(_components.tr,{children:[_jsx(_components.td,{children:_jsx(_components.strong,{children:`Retakes`})}),_jsx(_components.td,{children:`Let employees retake the quiz if they fail, and set how many attempts are allowed`})]}),_jsxs(_components.tr,{children:[_jsx(_components.td,{children:_jsx(_components.strong,{children:`Show answers`})}),_jsx(_components.td,{children:`Show the correct answers after submitting`})]})]})]}),_jsx(Check,{children:_jsx(_components.p,{children:`Correct answers stay on the server. Employees can’t see them before they answer.`})})]}),_jsx(Step,{title:`Link (link campaigns only)`,children:_jsxs(_components.ul,{children:[`\n`,_jsxs(_components.li,{children:[`Enter the web address. It must start with `,_jsx(_components.code,{children:`https://`}),`, and its domain must be on your `,_jsx(_components.a,{href:`#allowed-link-domains`,children:`allowed list`}),`.`]}),`\n`,_jsxs(_components.li,{children:[`For a file download you can also add the `,_jsx(_components.strong,{children:`file name`}),`, its `,_jsx(_components.strong,{children:`size`}),` and its `,_jsx(_components.strong,{children:`SHA-256 checksum`}),` (optional).`]}),`\n`,_jsx(_components.li,{children:`The link opens in the employee’s own browser.`}),`\n`]})}),_jsxs(Step,{title:`Audience — “Who should get this?”`,children:[_jsxs(_components.ul,{children:[`\n`,_jsxs(_components.li,{children:[_jsx(_components.strong,{children:`Who:`}),` pick `,_jsx(_components.strong,{children:`Everyone in the organization`}),`, or `,_jsx(_components.strong,{children:`Specific groups and people`}),` (choose user groups or single users).`]}),`\n`,_jsxs(_components.li,{children:[_jsx(_components.strong,{children:`On which computers?`}),` Pick `,_jsx(_components.strong,{children:`All operating systems`}),`, or only some of `,_jsx(_components.strong,{children:`Windows`}),`, `,_jsx(_components.strong,{children:`macOS`}),` and `,_jsx(_components.strong,{children:`Linux`}),`.`]}),`\n`,_jsxs(_components.li,{children:[_jsx(_components.strong,{children:`Also send to people and computers added later:`}),` new employees or devices that join while the campaign runs get it too. The system checks for new ones about every 5 minutes.`]}),`\n`,_jsx(_components.li,{children:_jsx(_components.strong,{children:`Who needs to respond:`})}),`\n`]}),_jsxs(AccordionGroup,{children:[_jsx(Accordion,{title:`Each person once, on any of their computers (default)`,id:`each-person-once-on-any-of-their-computers-default`,children:_jsx(_components.p,{children:`When a person answers on one computer, it closes on their other computers.`})}),_jsx(Accordion,{title:`Every computer separately`,id:`every-computer-separately`,children:_jsx(_components.p,{children:`Each computer needs its own answer.`})})]})]}),_jsxs(Step,{title:`Behaviour`,children:[_jsxs(_components.ul,{children:[`\n`,_jsxs(_components.li,{children:[_jsx(_components.strong,{children:`Stays on screen until done (no close button):`}),` the employee must complete it before it goes away. Critical notices and quizzes always stay.`]}),`\n`,_jsxs(_components.li,{children:[_jsx(_components.strong,{children:`Priority (0 to 100):`}),` if several campaigns are waiting, the higher number shows first.`]}),`\n`,_jsxs(_components.li,{children:[_jsx(_components.strong,{children:`Employees may snooze it (“Remind me later”):`}),` choose how many snoozes are allowed (1 to 10) and how long to wait before reminding again.`]}),`\n`]}),_jsx(Note,{children:_jsxs(_components.p,{children:[`Snooze isn’t available when `,_jsx(_components.strong,{children:`Stays on screen until done`}),` is on.`]})})]}),_jsx(Step,{title:`Schedule`,children:_jsxs(_components.ul,{children:[`\n`,_jsxs(_components.li,{children:[_jsx(_components.strong,{children:`Start showing:`}),` leave it empty to start as soon as you publish. It can’t be in the past.`]}),`\n`,_jsxs(_components.li,{children:[_jsx(_components.strong,{children:`Stop showing:`}),` leave it empty to run until every employee has done it or you stop it. It must be at least 1 minute after the start time.`]}),`\n`,_jsx(_components.li,{children:`Times are in your own time zone.`}),`\n`]})}),_jsxs(Step,{title:`Preview, save or publish`,children:[_jsxs(_components.ul,{children:[`\n`,_jsxs(_components.li,{children:[`A `,_jsx(_components.strong,{children:`live preview`}),` shows how the campaign will look on the employee’s desktop.`]}),`\n`,_jsxs(_components.li,{children:[`Click `,_jsx(_components.strong,{children:`Save draft`}),` to keep working on it later.`]}),`\n`,_jsxs(_components.li,{children:[`Click `,_jsx(_components.strong,{children:`Publish`}),` to send it. You’ll be asked to confirm, and then you’ll see how many devices it went to.`]}),`\n`]}),_jsx(Warning,{children:_jsx(_components.p,{children:`Publishing is refused if a link points to a domain that isn’t on your allowed list.`})})]})]}),`\n`,_jsx(Heading,{level:`3`,id:`after-publishing`,children:`After publishing`}),`\n`,_jsx(_components.p,{children:`Open a campaign from the list to see its details.`}),`\n`,_jsxs(Tabs,{children:[_jsxs(Tab,{title:`Recipients`,icon:`users`,id:`recipients`,children:[_jsx(_components.p,{children:`You can see every device and where the campaign is on it:`}),_jsxs(Table,{children:[_jsx(_components.thead,{children:_jsxs(_components.tr,{children:[_jsx(_components.th,{children:`Status`}),_jsx(_components.th,{children:`Meaning`})]})}),_jsxs(_components.tbody,{children:[_jsxs(_components.tr,{children:[_jsx(_components.td,{children:_jsx(_components.strong,{children:`Pending`})}),_jsx(_components.td,{children:`The device hasn’t picked it up yet.`})]}),_jsxs(_components.tr,{children:[_jsx(_components.td,{children:_jsx(_components.strong,{children:`Delivered`})}),_jsx(_components.td,{children:`It’s on the device but hasn’t been shown yet.`})]}),_jsxs(_components.tr,{children:[_jsx(_components.td,{children:_jsx(_components.strong,{children:`Displayed`})}),_jsx(_components.td,{children:`It’s on screen, with no answer yet.`})]}),_jsxs(_components.tr,{children:[_jsx(_components.td,{children:_jsx(_components.strong,{children:`Completed`})}),_jsx(_components.td,{children:`The employee acknowledged it, answered it, opened the link or finished the quiz.`})]}),_jsxs(_components.tr,{children:[_jsx(_components.td,{children:_jsx(_components.strong,{children:`Dismissed`})}),_jsx(_components.td,{children:`It was closed without an answer.`})]}),_jsxs(_components.tr,{children:[_jsx(_components.td,{children:_jsx(_components.strong,{children:`Expired`})}),_jsx(_components.td,{children:`It closed because the campaign ended or was stopped.`})]})]})]})]}),_jsxs(Tab,{title:`Quiz results`,icon:`chart-simple`,id:`quiz-results`,children:[_jsxs(_components.p,{children:[`See who `,_jsx(_components.strong,{children:`passed`}),`, who `,_jsx(_components.strong,{children:`didn’t pass`}),`, who is `,_jsx(_components.strong,{children:`still trying`}),` and who `,_jsx(_components.strong,{children:`hasn’t attempted`}),` it.`]}),_jsxs(_components.p,{children:[`You also see the `,_jsx(_components.strong,{children:`pass rate`}),`, the `,_jsx(_components.strong,{children:`first-try pass rate`}),` and the `,_jsx(_components.strong,{children:`number of attempts`}),`.`]})]})]}),`\n`,_jsx(Heading,{level:`3`,id:`what-you-can-do-with-a-campaign`,children:`What you can do with a campaign`}),`\n`,_jsxs(Table,{children:[_jsx(_components.thead,{children:_jsxs(_components.tr,{children:[_jsx(_components.th,{children:`Action`}),_jsx(_components.th,{children:`What happens`})]})}),_jsxs(_components.tbody,{children:[_jsxs(_components.tr,{children:[_jsx(_components.td,{children:_jsx(_components.strong,{children:`Edit draft`})}),_jsx(_components.td,{children:`Only drafts can be edited.`})]}),_jsxs(_components.tr,{children:[_jsx(_components.td,{children:_jsx(_components.strong,{children:`Publish`})}),_jsx(_components.td,{children:`Sends a draft.`})]}),_jsxs(_components.tr,{children:[_jsx(_components.td,{children:_jsx(_components.strong,{children:`Stop campaign`})}),_jsx(_components.td,{children:`The campaign closes on every device the next time the device checks in. Answers already given are kept.`})]})]})]}),`\n`,_jsx(Warning,{children:_jsx(_components.p,{children:`A stopped campaign can’t be started again.`})}),`\n`,_jsx(_components.hr,{}),`\n`,_jsx(Heading,{level:`2`,id:`support-requests`,children:`Support requests`}),`\n`,_jsx(_components.p,{children:`Employees ask IT for help straight from the Osto app, and you answer from the panel. The whole conversation stays in one place.`}),`\n`,_jsx(Heading,{level:`3`,id:`how-employees-raise-a-request`,children:`How employees raise a request`}),`\n`,_jsxs(Columns,{cols:2,children:[_jsx(`div`,{children:_jsxs(Steps,{children:[_jsx(Step,{title:`Open Support`,children:_jsxs(_components.p,{children:[`Open the Osto app and go to `,_jsx(_components.strong,{children:`Get help / Support`}),`.`]})}),_jsx(Step,{title:`Pick a category`,children:_jsxs(_components.p,{children:[_jsx(_components.strong,{children:`Laptop or hardware`}),`, `,_jsx(_components.strong,{children:`Software`}),`, `,_jsx(_components.strong,{children:`Access or passwords`}),`, `,_jsx(_components.strong,{children:`Network or Wi-Fi`}),`, `,_jsx(_components.strong,{children:`Security concern`}),`, or `,_jsx(_components.strong,{children:`Other`}),`.`]})}),_jsx(Step,{title:`Describe the problem`,children:_jsxs(_components.p,{children:[`A `,_jsx(_components.strong,{children:`subject`}),` (one line, up to 120 characters) and a `,_jsx(_components.strong,{children:`description`}),` (up to 4,000 characters).`]})}),_jsx(Step,{title:`Attach files if needed`,children:_jsx(_components.p,{children:`Screenshots or videos — see the limits below.`})}),_jsx(Step,{title:`Share device details`,children:_jsx(_components.p,{children:`Choose whether to include computer name, system and Osto version. This helps IT.`})}),_jsx(Step,{title:`Submit`,children:_jsxs(_components.p,{children:[`Click `,_jsx(_components.strong,{children:`Submit request`}),`. The employee gets a reference number, such as `,_jsx(_components.code,{children:`SUP-123`}),`.`]})})]})}),_jsx(Frame,{caption:`Get help in the Osto app.`,children:_jsx(OptimizedImage,{src:`https://mintcdn.com/osto/lbK1ZB_l0ZwTotqQ/images/itsm/app-support-request.png?fit=max\u0026auto=format\u0026n=lbK1ZB_l0ZwTotqQ\u0026q=85\u0026s=3e421cf198ed53d37363fe099707e43b`,alt:`Osto app Support screen with category choices, subject, description, attach files and Submit request button`,\"data-og-width\":`788`,width:`788`,\"data-og-height\":`846`,height:`846`,\"data-path\":`images/itsm/app-support-request.png`,\"data-optimize\":`true`,\"data-opv\":`3`,srcset:`https://mintcdn.com/osto/lbK1ZB_l0ZwTotqQ/images/itsm/app-support-request.png?w=280\u0026fit=max\u0026auto=format\u0026n=lbK1ZB_l0ZwTotqQ\u0026q=85\u0026s=9417fb675c200e76ba9e42366b26e3ed 280w, https://mintcdn.com/osto/lbK1ZB_l0ZwTotqQ/images/itsm/app-support-request.png?w=560\u0026fit=max\u0026auto=format\u0026n=lbK1ZB_l0ZwTotqQ\u0026q=85\u0026s=e9564ab6e284480f6f4bee6b258e1498 560w, https://mintcdn.com/osto/lbK1ZB_l0ZwTotqQ/images/itsm/app-support-request.png?w=840\u0026fit=max\u0026auto=format\u0026n=lbK1ZB_l0ZwTotqQ\u0026q=85\u0026s=4141d164e43049fefd2da004b110ce35 840w, https://mintcdn.com/osto/lbK1ZB_l0ZwTotqQ/images/itsm/app-support-request.png?w=1100\u0026fit=max\u0026auto=format\u0026n=lbK1ZB_l0ZwTotqQ\u0026q=85\u0026s=f0e5ec4b41e2a7b918c2102facf23fbc 1100w, https://mintcdn.com/osto/lbK1ZB_l0ZwTotqQ/images/itsm/app-support-request.png?w=1650\u0026fit=max\u0026auto=format\u0026n=lbK1ZB_l0ZwTotqQ\u0026q=85\u0026s=86ff12ef2b2fd927e084f3c127446495 1650w, https://mintcdn.com/osto/lbK1ZB_l0ZwTotqQ/images/itsm/app-support-request.png?w=2500\u0026fit=max\u0026auto=format\u0026n=lbK1ZB_l0ZwTotqQ\u0026q=85\u0026s=54dfc72ad7e006e5346717d40c815987 2500w`})})]}),`\n`,_jsxs(Table,{children:[_jsx(_components.thead,{children:_jsxs(_components.tr,{children:[_jsx(_components.th,{children:`Attachment`}),_jsx(_components.th,{children:`Formats`}),_jsx(_components.th,{children:`Max size`})]})}),_jsxs(_components.tbody,{children:[_jsxs(_components.tr,{children:[_jsx(_components.td,{children:_jsx(_components.strong,{children:`Images`})}),_jsx(_components.td,{children:`PNG, JPG, WebP`}),_jsx(_components.td,{children:`10 MB each`})]}),_jsxs(_components.tr,{children:[_jsx(_components.td,{children:_jsx(_components.strong,{children:`Videos`})}),_jsx(_components.td,{children:`MP4, WebM`}),_jsx(_components.td,{children:`50 MB each`})]})]})]}),`\n`,_jsxs(_components.p,{children:[`Up to `,_jsx(_components.strong,{children:`5 files`}),` per request.`]}),`\n`,_jsx(AccordionGroup,{children:_jsx(Accordion,{title:`A few more things about requests`,icon:`circle-question`,id:`a-few-more-things-about-requests`,children:_jsxs(_components.ul,{children:[`\n`,_jsxs(_components.li,{children:[`If the computer is `,_jsx(_components.strong,{children:`offline`}),`, the request is sent when it reconnects.`]}),`\n`,_jsxs(_components.li,{children:[`Each computer can send up to `,_jsx(_components.strong,{children:`10 requests a day`}),`. Any more are queued for later.`]}),`\n`,_jsxs(_components.li,{children:[`Employees can follow their requests under `,_jsx(_components.strong,{children:`My requests`}),` and reply to IT.`]}),`\n`,_jsxs(_components.li,{children:[`If an employee replies to a `,_jsx(_components.strong,{children:`resolved`}),` request, it opens again.`]}),`\n`]})})}),`\n`,_jsx(Heading,{level:`3`,id:`how-admins-handle-requests`,children:`How admins handle requests`}),`\n`,_jsxs(_components.p,{children:[`Go to `,_jsx(_components.strong,{children:`ITSM → Support requests`}),`.`]}),`\n`,_jsx(Heading,{level:`4`,id:`browsing-and-searching`,children:`Browsing and searching`}),`\n`,_jsxs(_components.ul,{children:[`\n`,_jsxs(_components.li,{children:[`Use the `,_jsx(_components.strong,{children:`status tabs`}),`: All, Unresolved, Open, In progress, Resolved, Closed.`]}),`\n`,_jsxs(_components.li,{children:[`Filter by `,_jsx(_components.strong,{children:`category`}),`, by `,_jsx(_components.strong,{children:`date`}),` (Today, Last 7, 30 or 90 days), or show `,_jsx(_components.strong,{children:`Unread only`}),`.`]}),`\n`,_jsxs(_components.li,{children:[_jsx(_components.strong,{children:`Search`}),` by subject, text, reference number or person.`]}),`\n`,_jsxs(_components.li,{children:[`A tile at the top shows your `,_jsx(_components.strong,{children:`Average first response time`}),`.`]}),`\n`]}),`\n`,_jsx(Heading,{level:`4`,id:`working-on-a-request`,children:`Working on a request`}),`\n`,_jsx(_components.p,{children:`Open a request to see:`}),`\n`,_jsxs(_components.ul,{children:[`\n`,_jsx(_components.li,{children:`the conversation;`}),`\n`,_jsx(_components.li,{children:`who sent it;`}),`\n`,_jsx(_components.li,{children:`their device details, if they shared them (computer, system, Osto version, hardware ID, last seen);`}),`\n`,_jsx(_components.li,{children:`any attachments.`}),`\n`]}),`\n`,_jsx(Heading,{level:`4`,id:`replying`,children:`Replying`}),`\n`,_jsxs(_components.ul,{children:[`\n`,_jsxs(_components.li,{children:[`Write a reply of up to `,_jsx(_components.strong,{children:`4,000 characters`}),`. You can attach up to `,_jsx(_components.strong,{children:`5 files`}),`.`]}),`\n`,_jsx(_components.li,{children:`If you attach files, you don’t need to write any text.`}),`\n`,_jsxs(_components.li,{children:[`Press `,_jsx(`kbd`,{children:`Ctrl`}),` + `,_jsx(`kbd`,{children:`Enter`}),` to send.`]}),`\n`,_jsx(_components.li,{children:`The employee sees your reply in the Osto app.`}),`\n`]}),`\n`,_jsx(Heading,{level:`4`,id:`changing-the-status`,children:`Changing the status`}),`\n`,_jsx(Mermaid,{chart:`stateDiagram-v2\n direction LR\n Open --> InProgress: Start working on it\n InProgress --> Open: Back to open\n Open --> Resolved: Mark resolved\n InProgress --> Resolved: Mark resolved\n Resolved --> Open: Reopen\n Open --> Closed: Close\n InProgress --> Closed: Close\n Resolved --> Closed: Close\n Closed --> Open: Reopen\n InProgress: In progress`}),`\n`,_jsxs(Table,{children:[_jsx(_components.thead,{children:_jsxs(_components.tr,{children:[_jsx(_components.th,{children:`From`}),_jsx(_components.th,{children:`You can move it to`})]})}),_jsxs(_components.tbody,{children:[_jsxs(_components.tr,{children:[_jsx(_components.td,{children:_jsx(_components.strong,{children:`Open`})}),_jsx(_components.td,{children:`Start working on it (In progress), Mark resolved, Close`})]}),_jsxs(_components.tr,{children:[_jsx(_components.td,{children:_jsx(_components.strong,{children:`In progress`})}),_jsx(_components.td,{children:`Mark resolved, Back to open, Close`})]}),_jsxs(_components.tr,{children:[_jsx(_components.td,{children:_jsx(_components.strong,{children:`Resolved`})}),_jsx(_components.td,{children:`Reopen, Close`})]}),_jsxs(_components.tr,{children:[_jsx(_components.td,{children:_jsx(_components.strong,{children:`Closed`})}),_jsx(_components.td,{children:`Reopen`})]})]})]}),`\n`,_jsx(_components.hr,{}),`\n`,_jsx(Heading,{level:`2`,id:`settings`,children:`Settings`}),`\n`,_jsxs(_components.p,{children:[`Go to `,_jsx(_components.strong,{children:`ITSM → Settings`}),`. There are three tabs.`]}),`\n`,_jsx(Heading,{level:`3`,id:`branding`,children:`Branding`}),`\n`,_jsx(_components.p,{children:`This is how your company appears at the top of every campaign on employee desktops.`}),`\n`,_jsxs(_components.ul,{children:[`\n`,_jsxs(_components.li,{children:[_jsx(_components.strong,{children:`Company name:`}),` leave it empty to use your organization’s name in Osto.`]}),`\n`,_jsxs(_components.li,{children:[_jsx(_components.strong,{children:`Logo:`}),` PNG or JPEG, square, at most `,_jsx(_components.strong,{children:`64 KB`}),`. Without a logo, desktops show your company’s initials.`]}),`\n`,_jsxs(_components.li,{children:[`A `,_jsx(_components.strong,{children:`preview`}),` shows how it will look.`]}),`\n`]}),`\n`,_jsx(Heading,{level:`3`,id:`allowed-link-domains`,children:`Allowed link domains`}),`\n`,_jsxs(_components.p,{children:[`This is the list of websites that campaign links may point to, for example `,_jsx(_components.code,{children:`example.com`}),`, or `,_jsx(_components.code,{children:`*.example.com`}),` for all its subdomains.`]}),`\n`,_jsxs(_components.ul,{children:[`\n`,_jsxs(_components.li,{children:[`It applies to links in `,_jsx(_components.strong,{children:`link campaigns`}),` and to links `,_jsx(_components.strong,{children:`inside messages`}),`.`]}),`\n`,_jsxs(_components.li,{children:[`Publishing refuses any `,_jsx(_components.code,{children:`https`}),` link to a domain that isn’t on this list.`]}),`\n`,_jsxs(_components.li,{children:[`You can add up to `,_jsx(_components.strong,{children:`100 domains`}),`.`]}),`\n`]}),`\n`,_jsx(Warning,{children:_jsx(_components.p,{children:`An empty list blocks all links.`})}),`\n`,_jsx(Heading,{level:`3`,id:`osto-app-—-“show-in-the-osto-app”`,children:`Osto app — “Show in the Osto app”`}),`\n`,_jsxs(_components.p,{children:[`Choose what employees can see in the Osto app on their computers. `,_jsx(_components.strong,{children:`Everything is on by default`}),` until you change it.`]}),`\n`,_jsx(Frame,{caption:`The Osto app home screen — each protection feature can be shown or hidden.`,children:_jsx(OptimizedImage,{src:`https://mintcdn.com/osto/lbK1ZB_l0ZwTotqQ/images/itsm/app-home.png?fit=max\u0026auto=format\u0026n=lbK1ZB_l0ZwTotqQ\u0026q=85\u0026s=10fda96c6c5a05320c6565bbedfaa0ea`,alt:`Osto app Home showing Protected status and policies: Secure access, App control, Web control, Device control, Data protection, Disk encryption and Screen lock`,style:{maxWidth:`620px`,margin:`0 auto`},\"data-og-width\":`788`,width:`788`,\"data-og-height\":`843`,height:`843`,\"data-path\":`images/itsm/app-home.png`,\"data-optimize\":`true`,\"data-opv\":`3`,srcset:`https://mintcdn.com/osto/lbK1ZB_l0ZwTotqQ/images/itsm/app-home.png?w=280\u0026fit=max\u0026auto=format\u0026n=lbK1ZB_l0ZwTotqQ\u0026q=85\u0026s=cc2326d68143a2daec03171fecdcec52 280w, https://mintcdn.com/osto/lbK1ZB_l0ZwTotqQ/images/itsm/app-home.png?w=560\u0026fit=max\u0026auto=format\u0026n=lbK1ZB_l0ZwTotqQ\u0026q=85\u0026s=3179dadfdb8661eb56d8f53ceab9bc6e 560w, https://mintcdn.com/osto/lbK1ZB_l0ZwTotqQ/images/itsm/app-home.png?w=840\u0026fit=max\u0026auto=format\u0026n=lbK1ZB_l0ZwTotqQ\u0026q=85\u0026s=3cb694a5770f751fdfa1ff994e99c99e 840w, https://mintcdn.com/osto/lbK1ZB_l0ZwTotqQ/images/itsm/app-home.png?w=1100\u0026fit=max\u0026auto=format\u0026n=lbK1ZB_l0ZwTotqQ\u0026q=85\u0026s=c06f9105e4bc34fe48aaf14304317f2e 1100w, https://mintcdn.com/osto/lbK1ZB_l0ZwTotqQ/images/itsm/app-home.png?w=1650\u0026fit=max\u0026auto=format\u0026n=lbK1ZB_l0ZwTotqQ\u0026q=85\u0026s=118210407299a4dab44664827bfa0fed 1650w, https://mintcdn.com/osto/lbK1ZB_l0ZwTotqQ/images/itsm/app-home.png?w=2500\u0026fit=max\u0026auto=format\u0026n=lbK1ZB_l0ZwTotqQ\u0026q=85\u0026s=6a4e1a6522b3758dc6c81349e33992ac 2500w`})}),`\n`,_jsxs(AccordionGroup,{children:[_jsx(Accordion,{title:`Campaigns`,icon:`bullhorn`,id:`campaigns`,children:_jsx(_components.p,{children:`If you turn this off, campaigns stop reaching employees and nothing new can be published. You can still see past campaigns in the panel.`})}),_jsx(Accordion,{title:`Support requests`,icon:`life-ring`,id:`support-requests`,children:_jsx(_components.p,{children:`If you turn this off, employees can’t send new requests or reply to existing ones from the app. You can still read and answer existing requests in the panel.`})}),_jsx(Accordion,{title:`Tip of the day`,icon:`lightbulb`,id:`tip-of-the-day`,children:_jsx(_components.p,{children:`Shows a daily security tip in the app.`})}),_jsxs(Accordion,{title:`Protection features`,icon:`shield-halved`,id:`protection-features`,children:[_jsx(_components.p,{children:`Choose which features employees can see in the app:`}),_jsxs(_components.ul,{children:[`\n`,_jsx(_components.li,{children:`App control`}),`\n`,_jsx(_components.li,{children:`Web control`}),`\n`,_jsx(_components.li,{children:`Device control`}),`\n`,_jsx(_components.li,{children:`Data protection`}),`\n`,_jsx(_components.li,{children:`Disk encryption (not available on Linux)`}),`\n`,_jsx(_components.li,{children:`Screen lock`}),`\n`,_jsx(_components.li,{children:`Threat monitoring`}),`\n`,_jsx(_components.li,{children:`Secure access`}),`\n`]}),_jsx(Frame,{caption:`Secure access as employees see it.`,children:_jsx(OptimizedImage,{src:`https://mintcdn.com/osto/lbK1ZB_l0ZwTotqQ/images/itsm/app-secure-access.png?fit=max\u0026auto=format\u0026n=lbK1ZB_l0ZwTotqQ\u0026q=85\u0026s=9c4dd4a659ff8948f898037dd412fe63`,alt:`Osto app Secure access screen showing Connected with download, upload, received and sent stats`,style:{maxWidth:`400px`,margin:`0 auto`},\"data-og-width\":`490`,width:`490`,\"data-og-height\":`500`,height:`500`,\"data-path\":`images/itsm/app-secure-access.png`,\"data-optimize\":`true`,\"data-opv\":`3`,srcset:`https://mintcdn.com/osto/lbK1ZB_l0ZwTotqQ/images/itsm/app-secure-access.png?w=280\u0026fit=max\u0026auto=format\u0026n=lbK1ZB_l0ZwTotqQ\u0026q=85\u0026s=f2669287986f4a217844b4358573ba30 280w, https://mintcdn.com/osto/lbK1ZB_l0ZwTotqQ/images/itsm/app-secure-access.png?w=560\u0026fit=max\u0026auto=format\u0026n=lbK1ZB_l0ZwTotqQ\u0026q=85\u0026s=63a3728de015754aa70776f9054762f8 560w, https://mintcdn.com/osto/lbK1ZB_l0ZwTotqQ/images/itsm/app-secure-access.png?w=840\u0026fit=max\u0026auto=format\u0026n=lbK1ZB_l0ZwTotqQ\u0026q=85\u0026s=cd0428668341b17b13a0a749f433907f 840w, https://mintcdn.com/osto/lbK1ZB_l0ZwTotqQ/images/itsm/app-secure-access.png?w=1100\u0026fit=max\u0026auto=format\u0026n=lbK1ZB_l0ZwTotqQ\u0026q=85\u0026s=af109c8e60f9d1c45ba60224870cfe10 1100w, https://mintcdn.com/osto/lbK1ZB_l0ZwTotqQ/images/itsm/app-secure-access.png?w=1650\u0026fit=max\u0026auto=format\u0026n=lbK1ZB_l0ZwTotqQ\u0026q=85\u0026s=0e5df319487c5828ef4fcb27548bb3b4 1650w, https://mintcdn.com/osto/lbK1ZB_l0ZwTotqQ/images/itsm/app-secure-access.png?w=2500\u0026fit=max\u0026auto=format\u0026n=lbK1ZB_l0ZwTotqQ\u0026q=85\u0026s=a6cf94addd5034f12df704c670f86547 2500w`})})]})]}),`\n`,_jsx(Note,{children:_jsxs(_components.p,{children:[`Hiding a feature only hides it from employees. `,_jsx(_components.strong,{children:`Your policies are still enforced.`})]})}),`\n`,_jsxs(_components.p,{children:[`Changes are only applied when you click `,_jsx(_components.strong,{children:`Save`}),`. The page also shows who last changed these settings and when.`]}),`\n`,_jsx(Info,{children:_jsxs(_components.p,{children:[`If your plan doesn’t include ITSM, you’ll still find these Osto app settings under `,_jsx(_components.strong,{children:`Policies → Osto app`}),`.`]})}),`\n`,_jsx(_components.hr,{}),`\n`,_jsx(Heading,{level:`2`,id:`tips-for-getting-the-best-out-of-itsm`,children:`Tips for getting the best out of ITSM`}),`\n`,_jsxs(CardGroup,{cols:2,children:[_jsx(Card,{title:`Set up the basics first`,icon:`flag-checkered`,children:_jsxs(_components.p,{children:[`Configure `,_jsx(_components.strong,{children:`Branding`}),` and `,_jsx(_components.strong,{children:`Allowed link domains`}),` before anything else. Without allowed domains, no link campaign can be published.`]})}),_jsx(Card,{title:`Use Critical notices sparingly`,icon:`triangle-exclamation`,children:_jsx(_components.p,{children:`They can’t be dismissed or snoozed.`})}),_jsx(Card,{title:`Respect people's focus`,icon:`clock`,children:_jsx(_components.p,{children:`Allow snooze on anything that isn’t urgent, so you don’t interrupt people’s work.`})}),_jsx(Card,{title:`Reach new joiners automatically`,icon:`user-plus`,children:_jsxs(_components.p,{children:[`Turn on `,_jsx(_components.strong,{children:`Also send to people added later`}),` for long-running campaigns such as onboarding or policy notices.`]})}),_jsx(Card,{title:`Get honest feedback`,icon:`user-secret`,children:_jsxs(_components.p,{children:[`Use `,_jsx(_components.strong,{children:`anonymous polls`}),` when you want people to speak freely.`]})}),_jsx(Card,{title:`Make quizzes teach`,icon:`graduation-cap`,children:_jsx(_components.p,{children:`Run security awareness quizzes with retakes and correct answers shown afterwards, so employees learn from their mistakes.`})}),_jsx(Card,{title:`Ask for device details`,icon:`laptop`,children:_jsx(_components.p,{children:`Device details in support requests make problems much faster to solve.`})}),_jsx(Card,{title:`Stay on top of the queue`,icon:`list-check`,children:_jsxs(_components.p,{children:[`Check the `,_jsx(_components.strong,{children:`Unresolved`}),` tab daily and keep an eye on your average first response time.`]})})]})]})}function MDXContent(props={}){const{wrapper:MDXLayout}={..._provideComponents(),...props.components};return MDXLayout?_jsx(MDXLayout,{...props,children:_jsx(_createMdxContent,{...props})}):_createMdxContent(props)}return{default:MDXContent};function _missingMdxReference(id,component){throw new Error(`Expected `+(component?`component`:`object`)+\" `\"+id+\"` to be defined: you likely forgot to import, pass, or provide it.\")}","frontmatter":{},"scope":{"config":{},"pageMetadata":{"title":"ITSM","sidebarTitle":"ITSM User Guide","description":"Reach every employee's desktop through the Osto app — send campaigns, answer support requests, and control exactly what employees see.","icon":"headset","href":"/how-to-guides/itsm/index"}}},"mdxSourceWithNoJs":null},"mdxExtracts":{"tableOfContents":[{"title":"Finding your way around","slug":"finding-your-way-around","depth":2,"children":[]},{"title":"Campaigns","slug":"campaigns","depth":2,"children":[{"title":"Types of campaign","slug":"types-of-campaign","depth":3,"children":[]},{"title":"The Campaigns page","slug":"the-campaigns-page","depth":3,"children":[]},{"title":"What each status means","slug":"what-each-status-means","depth":4,"children":[]},{"title":"Creating a campaign","slug":"creating-a-campaign","depth":3,"children":[]},{"title":"After publishing","slug":"after-publishing","depth":3,"children":[]},{"title":"What you can do with a campaign","slug":"what-you-can-do-with-a-campaign","depth":3,"children":[]}]},{"title":"Support requests","slug":"support-requests","depth":2,"children":[{"title":"How employees raise a request","slug":"how-employees-raise-a-request","depth":3,"children":[]},{"title":"How admins handle requests","slug":"how-admins-handle-requests","depth":3,"children":[]},{"title":"Browsing and searching","slug":"browsing-and-searching","depth":4,"children":[]},{"title":"Working on a request","slug":"working-on-a-request","depth":4,"children":[]},{"title":"Replying","slug":"replying","depth":4,"children":[]},{"title":"Changing the status","slug":"changing-the-status","depth":4,"children":[]}]},{"title":"Settings","slug":"settings","depth":2,"children":[{"title":"Branding","slug":"branding","depth":3,"children":[]},{"title":"Allowed link domains","slug":"allowed-link-domains","depth":3,"children":[]},{"title":"Osto app — “Show in the Osto app”","slug":"osto-app-—-“show-in-the-osto-app”","depth":3,"children":[]}]},{"title":"Tips for getting the best out of ITSM","slug":"tips-for-getting-the-best-out-of-itsm","depth":2,"children":[]}],"codeExamples":{}},"jsLinks":[],"dynamicCss":".mint-block {\n display: block\n}\n.mint-hidden {\n display: none\n}\n.dark\\:mint-block:is(.dark *) {\n display: block\n}\n.dark\\:mint-hidden:is(.dark *) {\n display: none\n}","subdomain":"osto","siteName":"Osto Documentation","title":"ITSM - Osto Documentation","navMaps":{"firstHrefInVersion":{},"firstHrefInLanguage":{}},"lastModified":"2026-11-19T05:06:52.060Z","originalFileLocation":"how-to-guides/itsm/index.mdx"},"headHtml":"\u003cscript data-mint-head>(function(){var d=document.documentElement,p=null;if(!p){try{p=localStorage.getItem(\"isDarkMode\")}catch(e){}if(p==='true')p='dark';else if(p==='false')p='light';if(p!=='light'\u0026\u0026p!=='dark'\u0026\u0026p!=='system')p=\"system\"}var r=p==='system'?(matchMedia(\"(prefers-color-scheme: dark)\").matches?'dark':'light'):p;d.classList.remove(r==='dark'?'light':'dark');d.classList.add(r);d.setAttribute(\"data-theme-preference\",p)})();\u003c/script>\u003cmeta data-mint-head name=\"description\" content=\"Reach every employee\u0026#x27;s desktop through the Osto app — send campaigns, answer support requests, and control exactly what employees see.\">\u003cmeta data-mint-head name=\"application-name\" content=\"Osto Documentation\">\u003cmeta data-mint-head name=\"generator\" content=\"Mintlify\">\u003clink data-mint-head rel=\"icon\" type=\"image/png\" sizes=\"192x192\" href=\"/mintlify-assets/_mintlify/favicons/osto/hH9gK1DHHLr3yESH/_generated/favicon/android-chrome-192x192.png\" media=\"(prefers-color-scheme: light)\">\u003clink data-mint-head rel=\"apple-touch-icon\" type=\"image/png\" sizes=\"180x180\" href=\"/mintlify-assets/_mintlify/favicons/osto/hH9gK1DHHLr3yESH/_generated/favicon/apple-touch-icon.png\">\u003clink data-mint-head rel=\"icon\" type=\"image/png\" sizes=\"16x16\" href=\"/mintlify-assets/_mintlify/favicons/osto/hH9gK1DHHLr3yESH/_generated/favicon/favicon-16x16.png\" media=\"(prefers-color-scheme: light)\">\u003clink data-mint-head rel=\"icon\" type=\"image/png\" sizes=\"32x32\" href=\"/mintlify-assets/_mintlify/favicons/osto/hH9gK1DHHLr3yESH/_generated/favicon/favicon-32x32.png\" media=\"(prefers-color-scheme: light)\">\u003clink data-mint-head rel=\"shortcut icon\" type=\"image/x-icon\" href=\"/mintlify-assets/_mintlify/favicons/osto/hH9gK1DHHLr3yESH/_generated/favicon/favicon.ico\" media=\"(prefers-color-scheme: light)\">\u003clink data-mint-head rel=\"icon\" type=\"image/png\" sizes=\"192x192\" href=\"/mintlify-assets/_mintlify/favicons/osto/hH9gK1DHHLr3yESH/_generated/favicon-dark/android-chrome-192x192.png\" media=\"(prefers-color-scheme: dark)\">\u003clink data-mint-head rel=\"icon\" type=\"image/png\" sizes=\"16x16\" href=\"/mintlify-assets/_mintlify/favicons/osto/hH9gK1DHHLr3yESH/_generated/favicon-dark/favicon-16x16.png\" media=\"(prefers-color-scheme: dark)\">\u003clink data-mint-head rel=\"icon\" type=\"image/png\" sizes=\"32x32\" href=\"/mintlify-assets/_mintlify/favicons/osto/hH9gK1DHHLr3yESH/_generated/favicon-dark/favicon-32x32.png\" media=\"(prefers-color-scheme: dark)\">\u003clink data-mint-head rel=\"shortcut icon\" type=\"image/x-icon\" href=\"/mintlify-assets/_mintlify/favicons/osto/hH9gK1DHHLr3yESH/_generated/favicon-dark/favicon.ico\" media=\"(prefers-color-scheme: dark)\">\u003cmeta data-mint-head property=\"og:title\" content=\"ITSM - Osto Documentation\">\u003cmeta data-mint-head property=\"og:description\" content=\"Reach every employee\u0026#x27;s desktop through the Osto app — send campaigns, answer support requests, and control exactly what employees see.\">\u003cmeta data-mint-head property=\"og:site_name\" content=\"Osto Documentation\">\u003cmeta data-mint-head property=\"og:url\" content=\"https://docs.osto.one/how-to-guides/itsm\">\u003cmeta data-mint-head property=\"og:type\" content=\"website\">\u003cmeta data-mint-head property=\"og:image\" content=\"https://osto.mintlify.site/_mintlify/api/og/v2?division=ITSM\u0026amp;title=ITSM\u0026amp;description=Reach+every+employee%27s+desktop+through+the+Osto+app+%E2%80%94+send+campaigns%2C+answer+support+requests%2C+and+control+exactly+what+employees+see.\u0026amp;theme=47d3aa50dc3bcda640e95331\u0026amp;signature=e6310da685d28a543e8f65e3d68007b695f9840b105da812573bada7fad88381\">\u003cmeta data-mint-head property=\"og:image:width\" content=\"1200\">\u003cmeta data-mint-head property=\"og:image:height\" content=\"630\">\u003cmeta data-mint-head name=\"twitter:card\" content=\"summary_large_image\">\u003cmeta data-mint-head name=\"twitter:title\" content=\"ITSM - Osto Documentation\">\u003cmeta data-mint-head name=\"twitter:description\" content=\"Reach every employee\u0026#x27;s desktop through the Osto app — send campaigns, answer support requests, and control exactly what employees see.\">\u003cmeta data-mint-head name=\"twitter:image\" content=\"https://osto.mintlify.site/_mintlify/api/og/v2?division=ITSM\u0026amp;title=ITSM\u0026amp;description=Reach+every+employee%27s+desktop+through+the+Osto+app+%E2%80%94+send+campaigns%2C+answer+support+requests%2C+and+control+exactly+what+employees+see.\u0026amp;theme=47d3aa50dc3bcda640e95331\u0026amp;signature=e6310da685d28a543e8f65e3d68007b695f9840b105da812573bada7fad88381\">\u003cmeta data-mint-head name=\"twitter:image:width\" content=\"1200\">\u003cmeta data-mint-head name=\"twitter:image:height\" content=\"630\">\u003cmeta data-mint-head name=\"msapplication-config\" content=\"/mintlify-assets/_mintlify/favicons/osto/hH9gK1DHHLr3yESH/_generated/favicon/browserconfig.xml\">\u003cmeta data-mint-head name=\"apple-mobile-web-app-title\" content=\"Osto Documentation\">\u003cmeta data-mint-head name=\"msapplication-TileColor\" content=\"#0066CC\">\u003clink data-mint-head rel=\"canonical\" href=\"https://docs.osto.one/how-to-guides/itsm\">\u003clink data-mint-head rel=\"alternate\" type=\"application/xml\" href=\"/sitemap.xml\">\u003clink data-mint-head rel=\"alternate\" type=\"text/markdown\" href=\"/how-to-guides/itsm.md\">\u003cscript data-mint-head type=\"application/ld+json\">{\"@context\":\"https://schema.org\",\"@graph\":[{\"@type\":\"Organization\",\"@id\":\"https://docs.osto.one/#organization\",\"name\":\"Osto Documentation\",\"url\":\"https://docs.osto.one\",\"logo\":{\"@type\":\"ImageObject\",\"url\":\"https://mintcdn.com/osto/2kI97xitQLxYCuFb/logo/light.png?fit=max\u0026auto=format\u0026n=2kI97xitQLxYCuFb\u0026q=85\u0026s=cfc939c048d40caec53b1ad32ace7c7c\"}},{\"@type\":\"WebSite\",\"@id\":\"https://docs.osto.one#website\",\"name\":\"Osto Documentation\",\"url\":\"https://docs.osto.one\",\"publisher\":{\"@id\":\"https://docs.osto.one/#organization\"}},{\"@type\":\"WebPage\",\"@id\":\"https://docs.osto.one/how-to-guides/itsm#webpage\",\"url\":\"https://docs.osto.one/how-to-guides/itsm\",\"name\":\"ITSM\",\"description\":\"Reach every employee's desktop through the Osto app — send campaigns, answer support requests, and control exactly what employees see.\",\"dateModified\":\"2026-11-19T05:06:52.060Z\",\"isPartOf\":{\"@id\":\"https://docs.osto.one#website\"},\"breadcrumb\":{\"@id\":\"https://docs.osto.one/how-to-guides/itsm#breadcrumb\"}},{\"@type\":\"BreadcrumbList\",\"@id\":\"https://docs.osto.one/how-to-guides/itsm#breadcrumb\",\"itemListElement\":[{\"@type\":\"ListItem\",\"position\":1,\"name\":\"Osto Documentation\",\"item\":\"https://docs.osto.one\"},{\"@type\":\"ListItem\",\"position\":2,\"name\":\"ITSM\",\"item\":\"https://docs.osto.one/how-to-guides/itsm\"}]},{\"@type\":[\"Article\",\"TechArticle\"],\"@id\":\"https://docs.osto.one/how-to-guides/itsm#article\",\"headline\":\"ITSM\",\"name\":\"ITSM\",\"description\":\"Reach every employee's desktop through the Osto app — send campaigns, answer support requests, and control exactly what employees see.\",\"url\":\"https://docs.osto.one/how-to-guides/itsm\",\"mainEntityOfPage\":{\"@id\":\"https://docs.osto.one/how-to-guides/itsm#webpage\"},\"dateModified\":\"2026-11-19T05:06:52.060Z\",\"publisher\":{\"@id\":\"https://docs.osto.one/#organization\"},\"isPartOf\":{\"@id\":\"https://docs.osto.one#website\"}}]}\u003c/script>\u003cscript data-mint-head type=\"application/ld+json\">{\"@context\":\"https://schema.org\",\"@type\":\"WebSite\",\"name\":\"Osto Documentation\",\"publisher\":{\"@type\":\"Organization\",\"name\":\"Osto Documentation\"},\"provider\":{\"@type\":\"Organization\",\"name\":\"Mintlify\",\"url\":\"https://mintlify.com\"}}\u003c/script>","agentPointerHref":"/how-to-guides/itsm.md","siteName":"Osto Documentation","nav":{"global":{"anchors":[{"anchor":"Website","icon":"globe","href":"https://osto.one"},{"anchor":"Support","icon":"envelope","href":"mailto:connect@osto.one"}]},"pages":[{"group":"Overview","pages":[{"title":"Welcome to Osto","href":"/index"},{"title":"High Level Architecture","href":"/overview/high-level-architecture"},{"title":"What is Web Application Protection","href":"/overview/what-is-web-app-protection"},{"title":"WAF Availability \u0026 Uptime","href":"/overview/waf-availability"}]},{"group":"Getting Started","pages":[{"title":"Core Concepts","href":"/getting-started/core-concepts"},{"title":"Quick Start Guide","href":"/getting-started/quick-start"}]},{"group":"Asset Management","pages":[{"title":"Asset Management","href":"/how-to-guides/asset-management/index"},{"title":"Managing Websites \u0026 Subdomains","href":"/how-to-guides/asset-management/managing-websites"},{"title":"Managing SSL Certificates","href":"/how-to-guides/asset-management/managing-ssl-certificates"},{"title":"Managing Secure Servers","href":"/how-to-guides/asset-management/managing-secure-servers"},{"title":"Managing Users \u0026 Groups","href":"/how-to-guides/asset-management/managing-users-groups"}]},{"group":"Objects Management","pages":[{"title":"Objects Management","href":"/how-to-guides/objects/index"}]},{"group":"Policy Configuration","pages":[{"title":"Policy Configuration","href":"/how-to-guides/policy-configuration/index"},{"group":"Website Protection Policy","pages":[{"title":"Website Protection Policy","href":"/how-to-guides/policy-configuration/website-protection-policy"},{"title":"How to Create a Policy Exception on the Dashboard","href":"/how-to-guides/policy-configuration/how-to-create-a-policy-exception"}]},{"title":"User Protection Policy","href":"/how-to-guides/policy-configuration/user-protection-policy"},{"title":"Secure Server Access Policy","href":"/how-to-guides/policy-configuration/secure-server-access-policy"}]},{"group":"Posture Management","pages":[{"title":"Cloud Security","href":"/how-to-guides/posture-management/index"},{"title":"Connecting AWS to Osto","href":"/how-to-guides/posture-management/connecting-aws"},{"title":"Connecting GCP to Osto","href":"/how-to-guides/posture-management/connecting-gcp"},{"title":"Connecting Microsoft Azure to Osto","href":"/how-to-guides/posture-management/connecting-azure"}]},{"group":"Scanner","pages":[{"title":"Scanner","href":"/how-to-guides/scanner/index"},{"title":"Web Scanner","href":"/how-to-guides/scanner/web-scanner"},{"title":"App Scanner","href":"/how-to-guides/scanner/app-scanner"}]},{"group":"Code Security","pages":[{"title":"SAST","href":"/how-to-guides/code-security/sast"}]},{"group":"Compliance","pages":[{"title":"AutoComply","href":"/how-to-guides/compliance/autocomply"},{"title":"Awareness Training","description":"Build security awareness training programs, assign them to employees, and track completion — plus the employee experience for completing training and acknowledging policies.","href":"/how-to-guides/compliance/awareness-training"}]},{"group":"ITSM","pages":[{"title":"ITSM","sidebarTitle":"ITSM User Guide","icon":"headset","href":"/how-to-guides/itsm/index"}]},{"group":"Logs","pages":[{"title":"Logs","description":"Searchable, filterable records of web traffic and threats, secure-server sessions, domain filtering, incidents, admin actions, and authentication events.","href":"/how-to-guides/logs/index"},{"title":"Web App Logs","href":"/how-to-guides/logs/web-app-logs"},{"title":"Secure Server Logs","href":"/how-to-guides/logs/secure-server-logs"},{"title":"Domain Filtering Logs","href":"/how-to-guides/logs/domain-filtering-logs"},{"title":"Incident Logs","href":"/how-to-guides/logs/incident-logs"},{"title":"Audit Logs","href":"/how-to-guides/logs/audit-logs"},{"title":"Auth Logs","href":"/how-to-guides/logs/auth-logs"}]},{"group":"Support \u0026 Resources","pages":[{"title":"Best Practices","href":"/support/best-practices"},{"title":"Frequently Asked Questions","href":"/support/faqs"},{"title":"Troubleshooting Common Issues","href":"/support/troubleshooting"},{"title":"Glossary","href":"/support/glossary"},{"title":"Getting Help","href":"/support/getting-help"}]},{"title":"Release Notes","href":"/release-notes"}]},"basePath":"","title":"ITSM - Osto Documentation","deploymentId":"dpl_FZMKUpaaKiVETbfqhoUe4sPFDTmY","buildId":"dpl_FZMKUpaaKiVETbfqhoUe4sPFDTmY","dynamics":["07c022d89b","a74be98ba7"],"chunks":["Frame-DBAS9Liu.js","DynamicMarkdown-C4w9kavL.js","zoom-image-lightbox-B9O1U98p.js","lightbox-handle-r17bVUz3.js"]}